


-
Type
- Dante
- Networking
- Control
-
System Management
- Composer Management Software
- SymVue Screen Authoring
- AV-Ops Center Remote Monitoring
- ARC-WEB Control Interface Signal Processing
- D100 AVoIP DSP Server
- Radius NX AVoIP DSP
- Prism AVoIP DSP
- Edge AVoIP DSP
- DSP I/O Expansion Cards
- Jupiter DSP
- Zone Mix 761 DSP I/O Connectivity
- xIO Bluetooth Endpoints
- xIO XLR Endpoints
- xIO AVoIP DSP Audio Expanders Control Systems
- T-Series Touchscreen Controllers
- W-Series Controllers
- Control Server for Personal Devices
- xControl GPIO Expander
- ARC-Series Controllers
How to Record Audio from a Dante bus in Symetrix to your Computer in Composer
Product:Composer Management Software
Type: Dante
Type: Networking
This tech tip will provide instructions for recording audio from your Dante bus in Composer to your computer via the Dante Virtual Sound Card or Dante Via with ASIO or WDM supported recording software.
Potential Applications:
- House of Worship – Recording sermons and choirs
- Theatre/Live Audio – Recording live shows and performances
- Courtrooms – Recording court proceedings
- Conference Room – Recording conference or troubleshooting AEC
What you will need:
- Symetrix Composer
- Symetrix Dante enabled DSP (Prism, Radius and/or Edge)
- Dante Controller (www.audinate.com)
- Dante Virtual Soundcard (DVS) or Dante Via (www.audinate.com)
- An ASIO or WDM capable program such as Cubase, Logic, Sound Forge, ProTools, Reaper or Audacity
Creating your Dante Bus:
1) Connect your computer to your Symetrix Dante enabled DSP via the Ethernet port.
2) Open Composer.
3) From the Toolkit add the DSP to the site view page.
4) Double click the DSP and open the design view page.
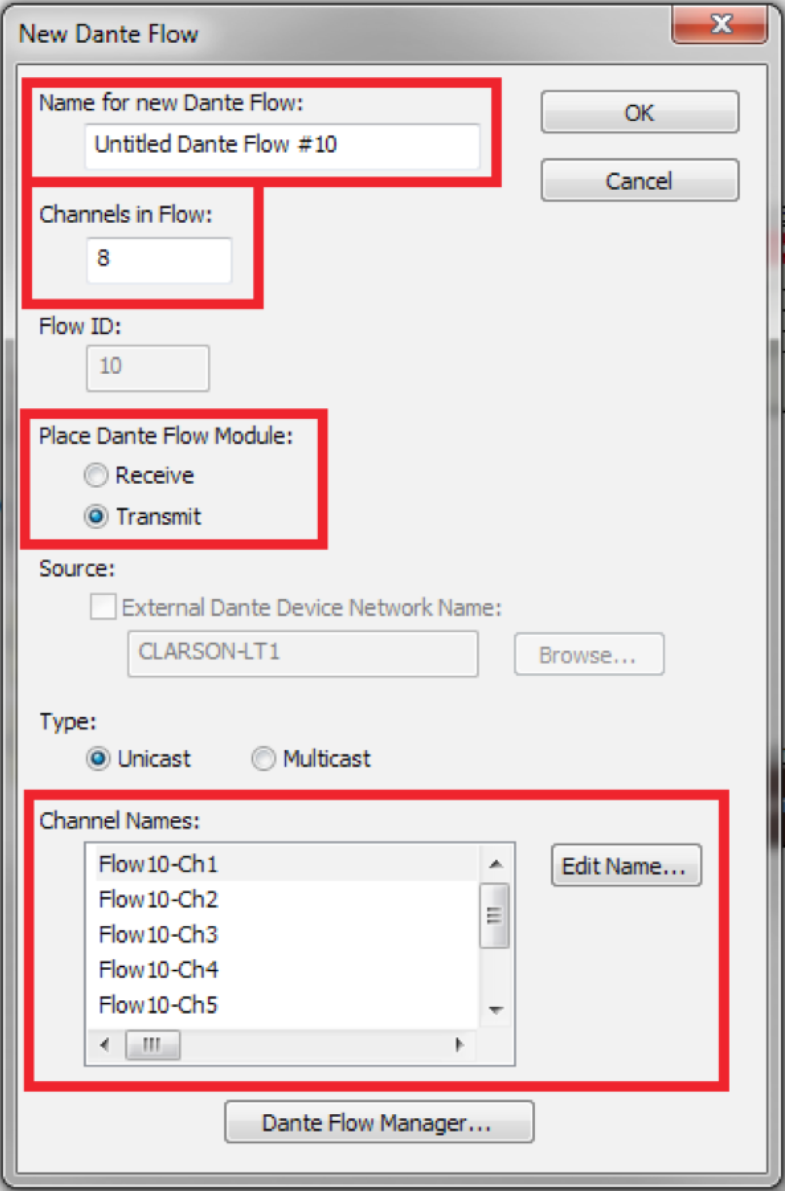
5) Create a Dante transmit flow. Toolkit>Dante Transmit and Receive Flows>New Transmit/Receive Flow…
6) Enter your Dante Flow name, select the amount of channels you need, make sure Transmit is selected and label the channels.
7) Select OK.
8) Wire your audio source into your Dante Bus.
Creating your Dante Bus:
1) Connect your computer to your Symetrix Dante enabled DSP via the Ethernet port.
2) Open Composer.
3) From the Toolkit add the DSP to the site view page.
4) Double click the DSP and open the design view page.
5) Create a Dante transmit flow. Toolkit>Dante Transmit and Receive Flows>New Transmit/Receive Flow…
6) Enter your Dante Flow name, select the amount of channels you need, make sure Transmit is selected and label the channels.
7) Select OK.
8) Wire your audio source into your Dante Bus.
9) Go on-line with your DSP
Now that you have the site file archived in your DSP, we can connect your computer to your Dante network.
1) Connect your computer to the Dante Network.
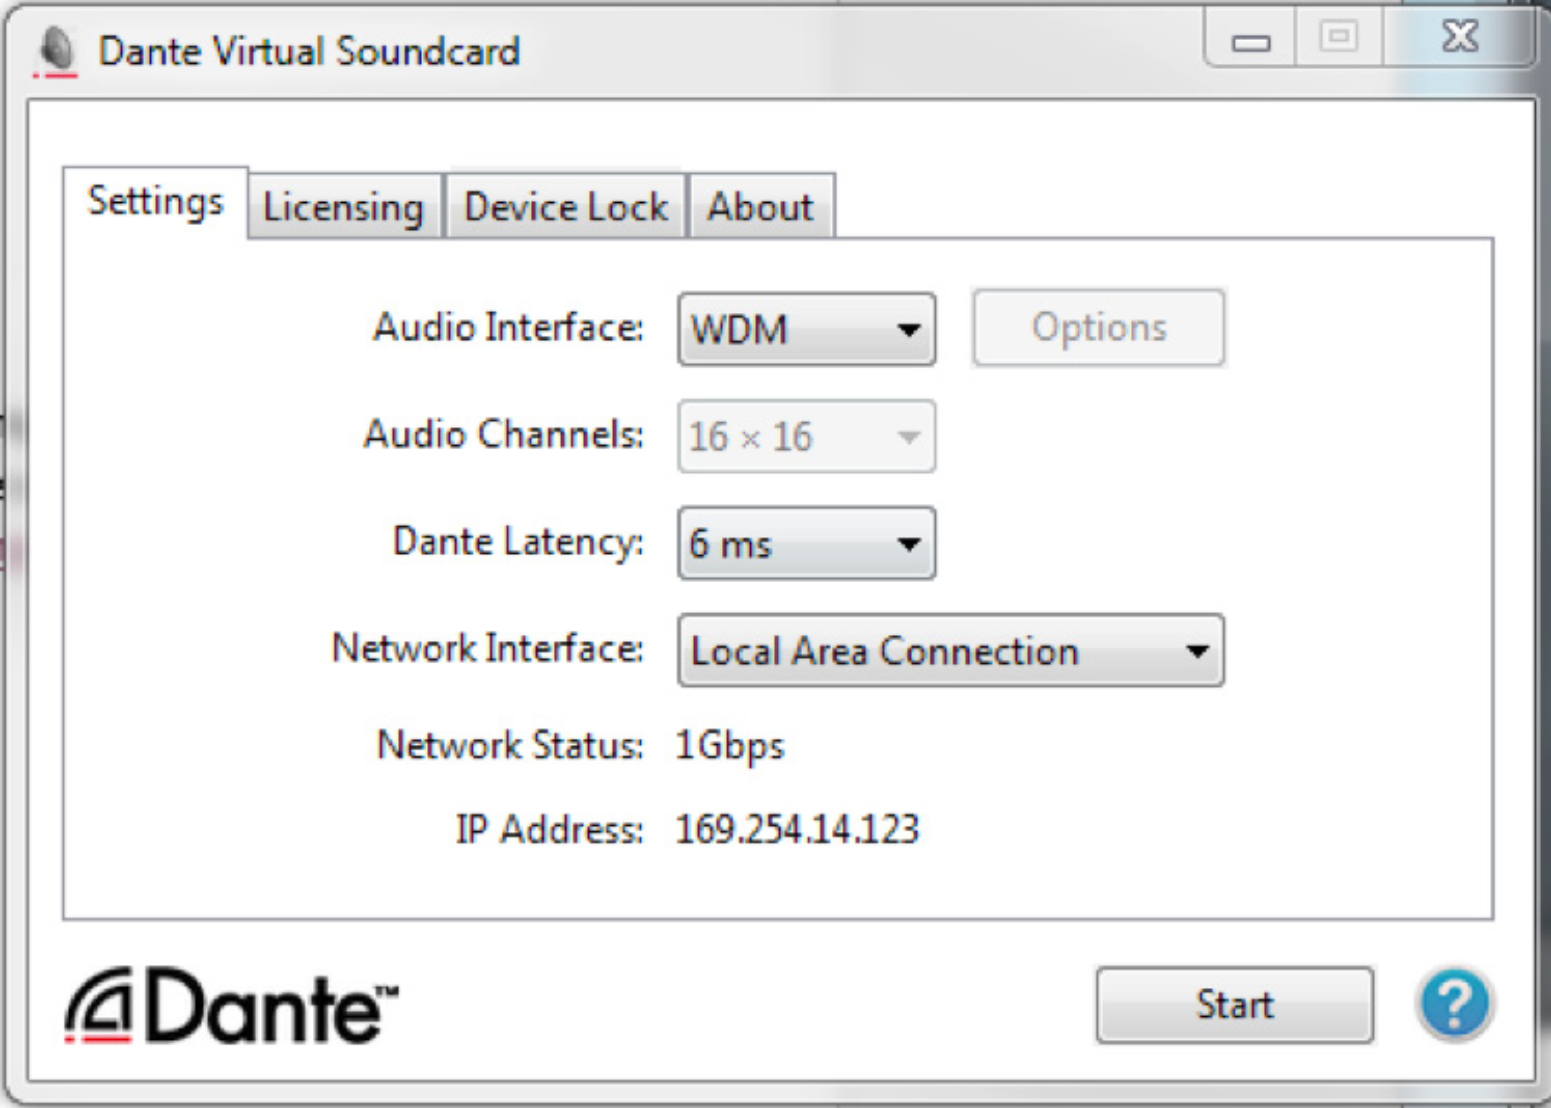
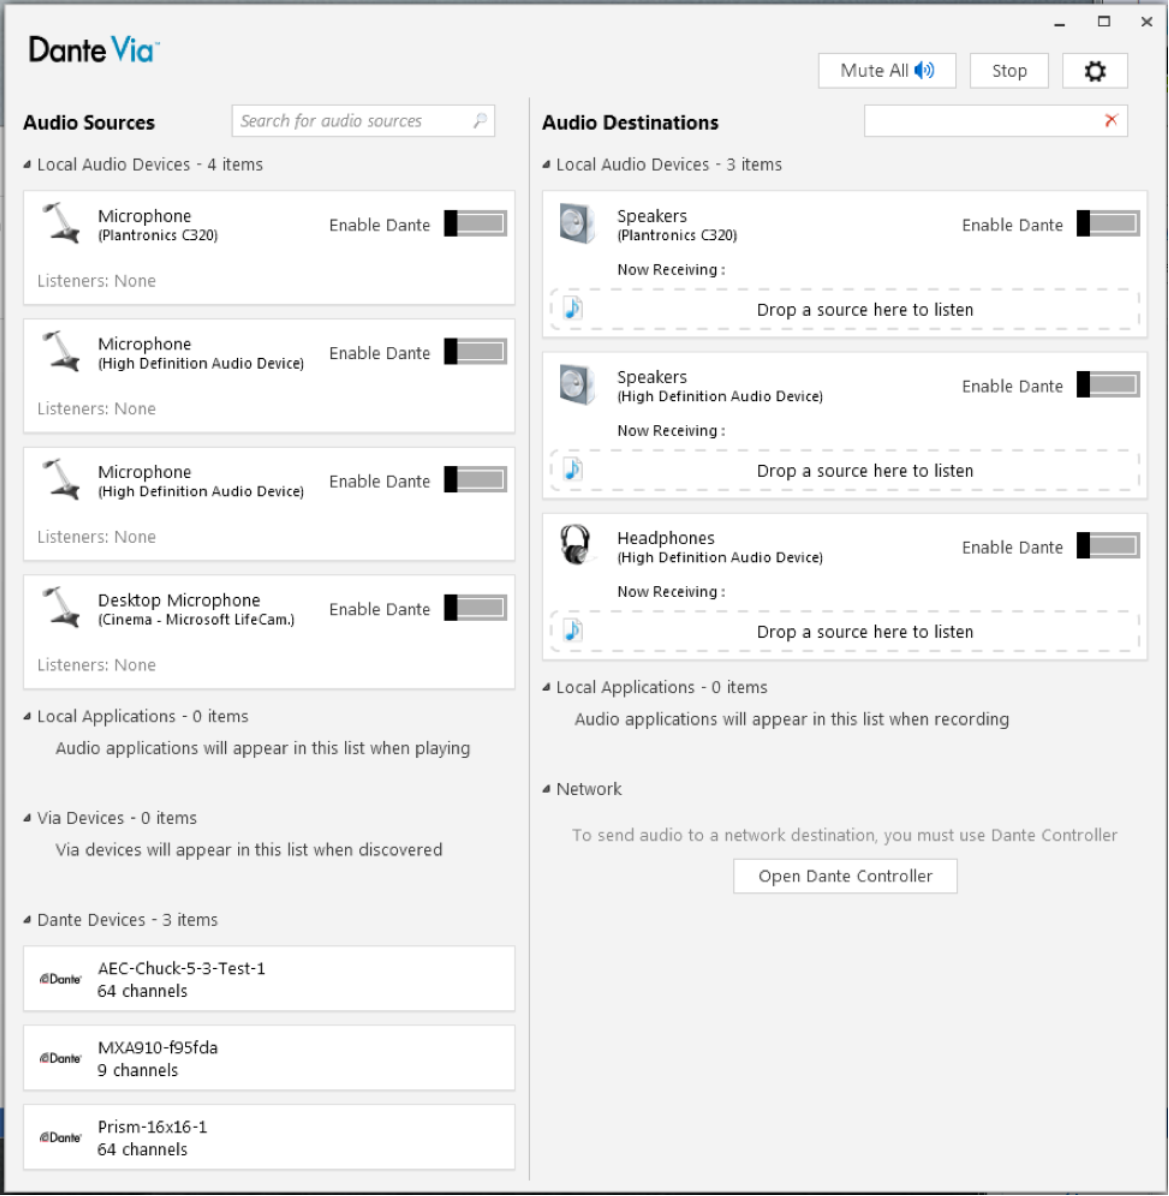
2) Open and enable your Dante Virtual Sound Card or Dante Via.
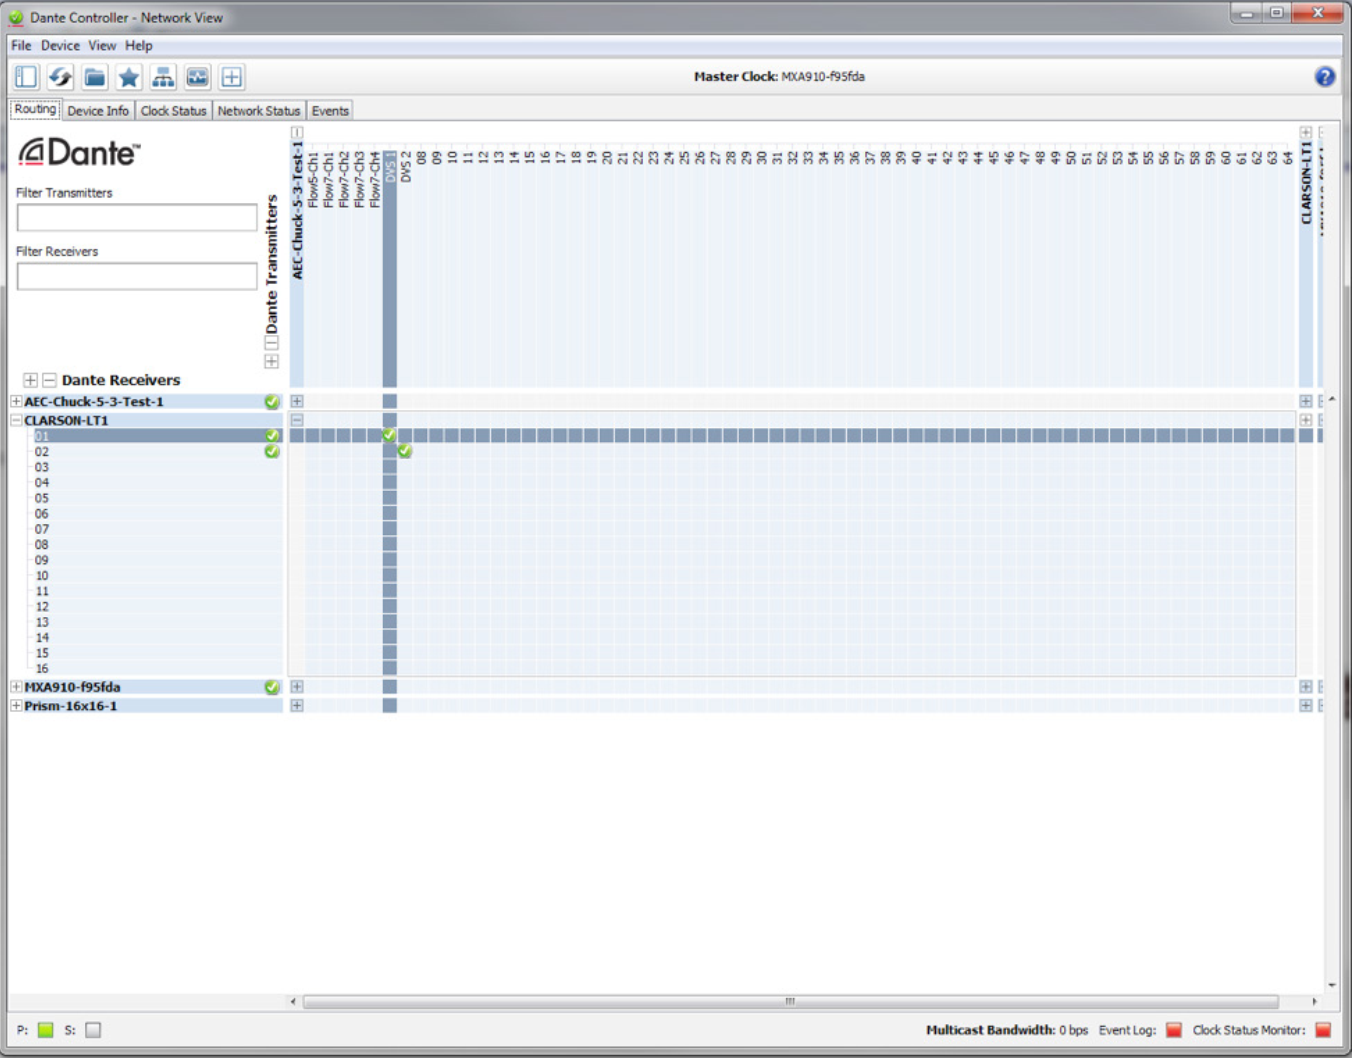
3) Open Dante Controller and create the subscriptions between the DSP and your computer.
We can now open your ASIO or WDM capable program.
This example will be utilizing Reaper:
1) Open Reaper.
2) Select Options>Preferences.
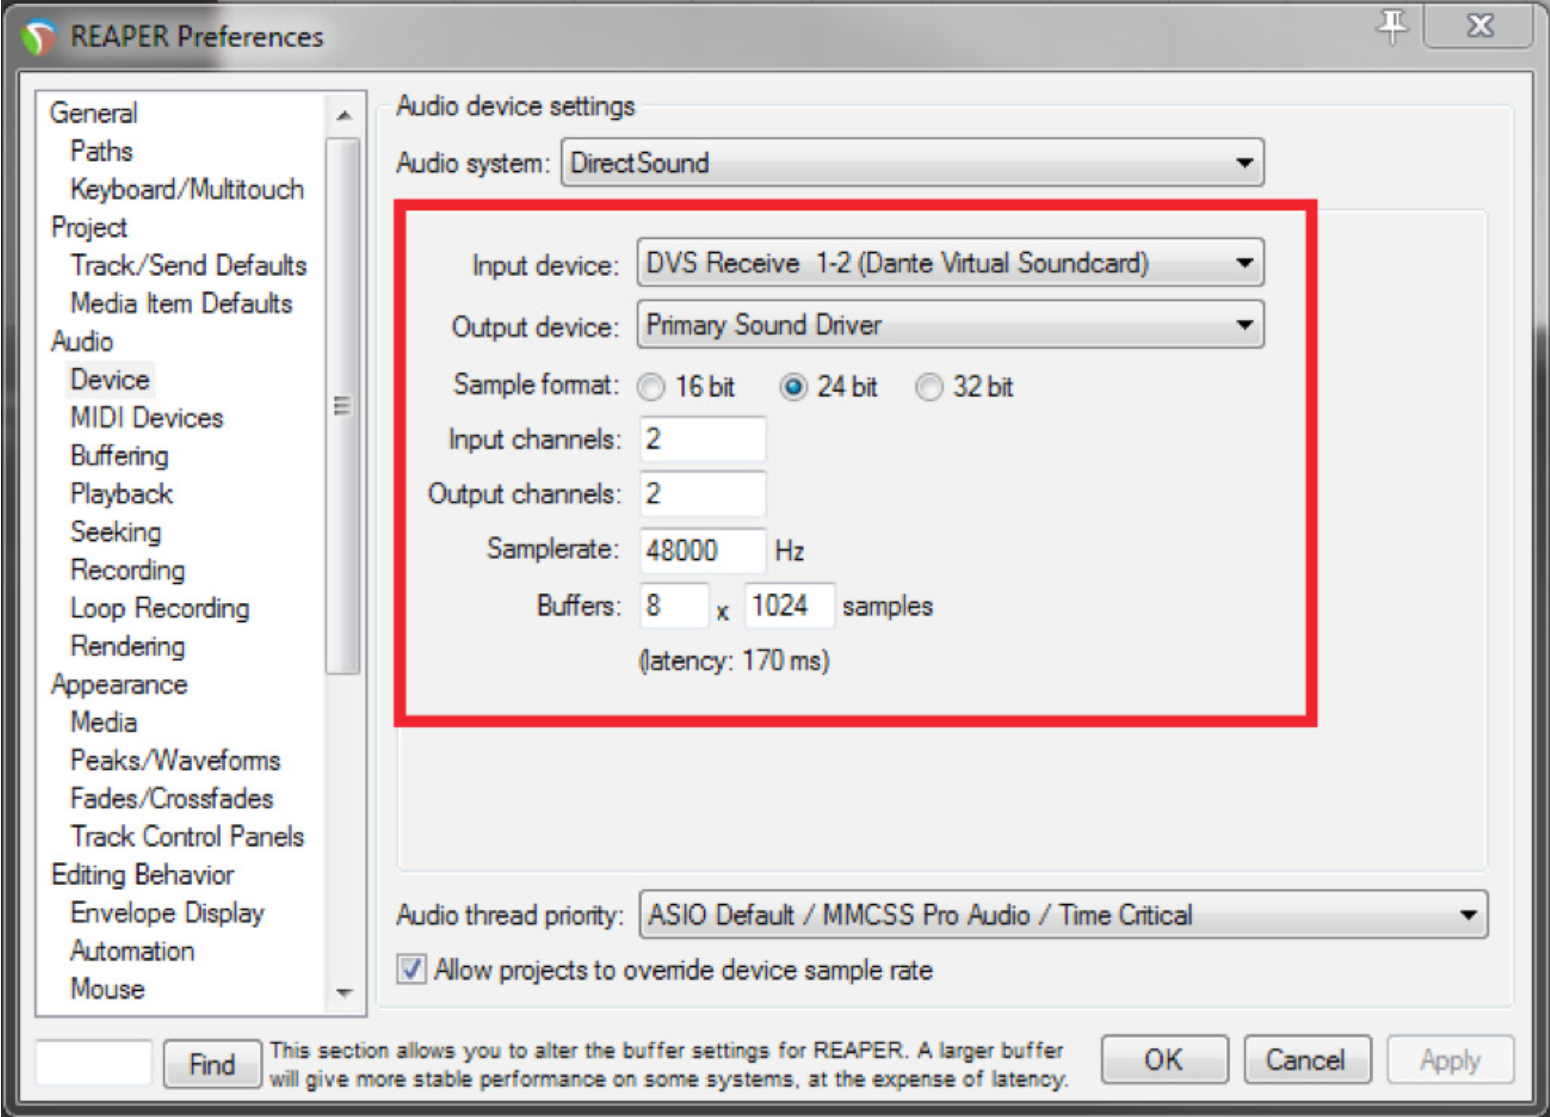
3) Select Devices in the Audio menu.
4) Select DVS Receive 1-2 (Dante Virtual Soundcard) for the input device.
5) Select your Sample Rate (48000), Bit Depth (24 bit), and Channels and then Select OK.
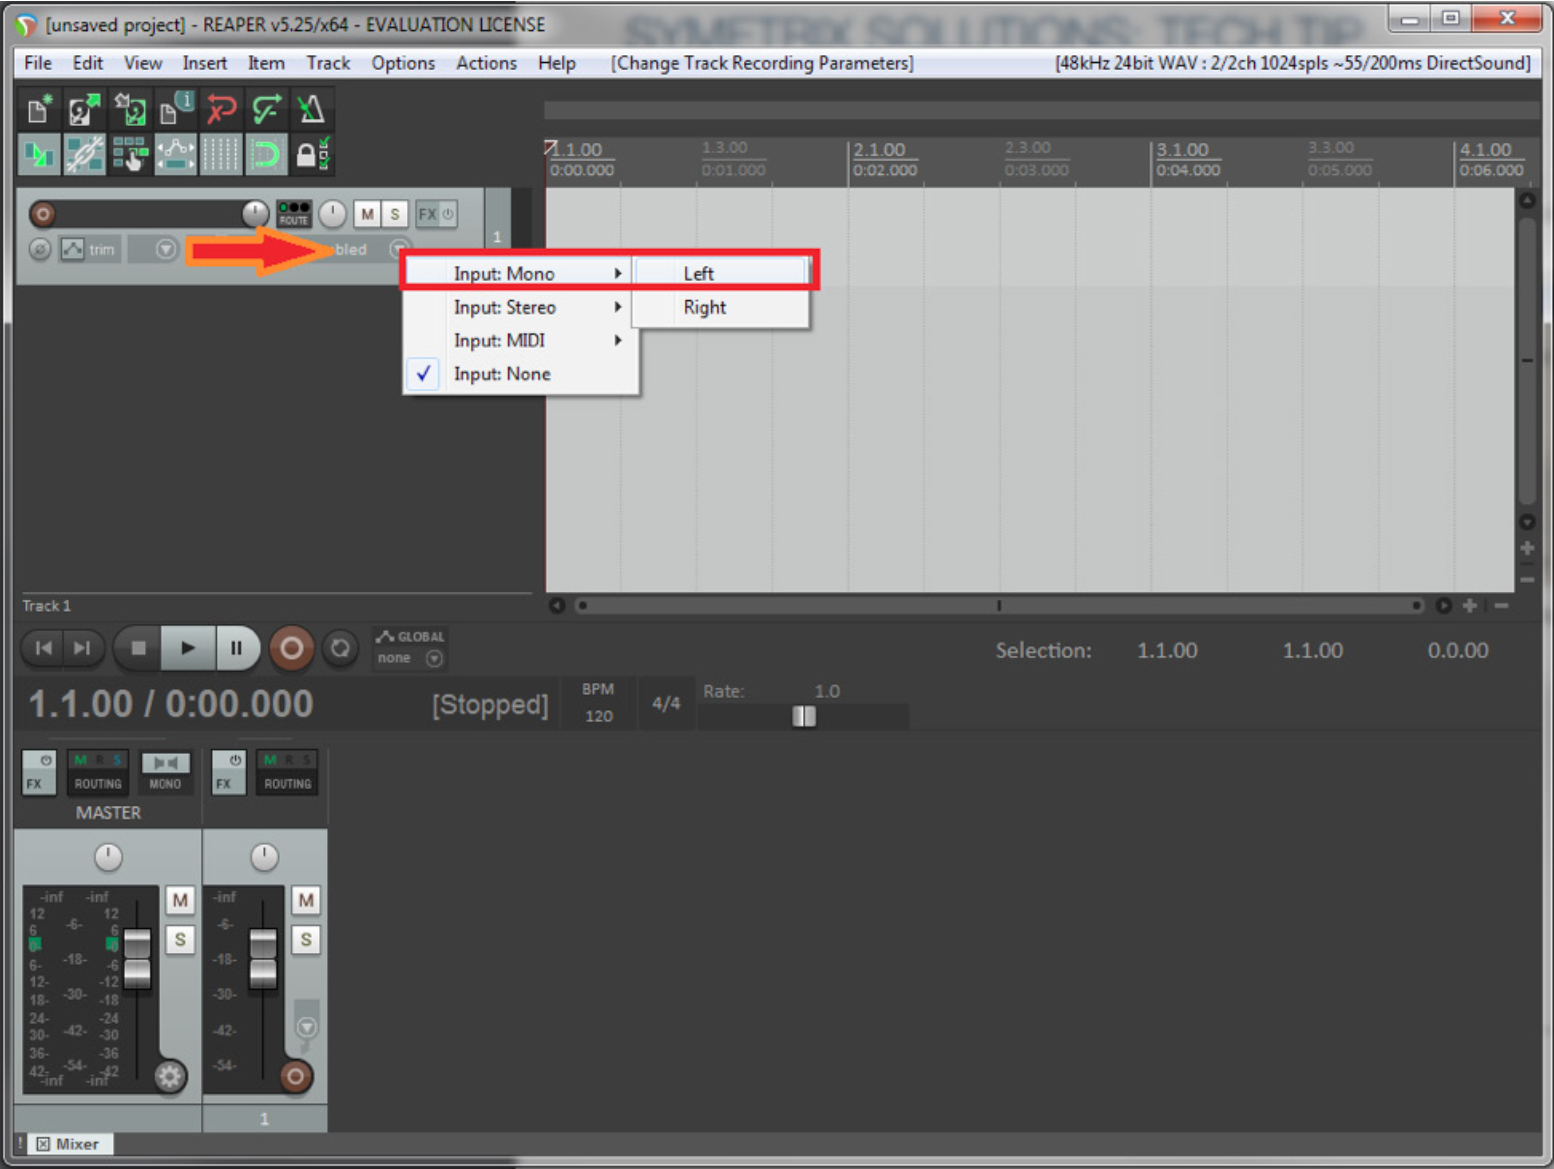
6) Select Track>Insert New Track.
7) Select input source. Assign Input:Mono>Left to this track
8) Insert another track. Track>Insert New Track
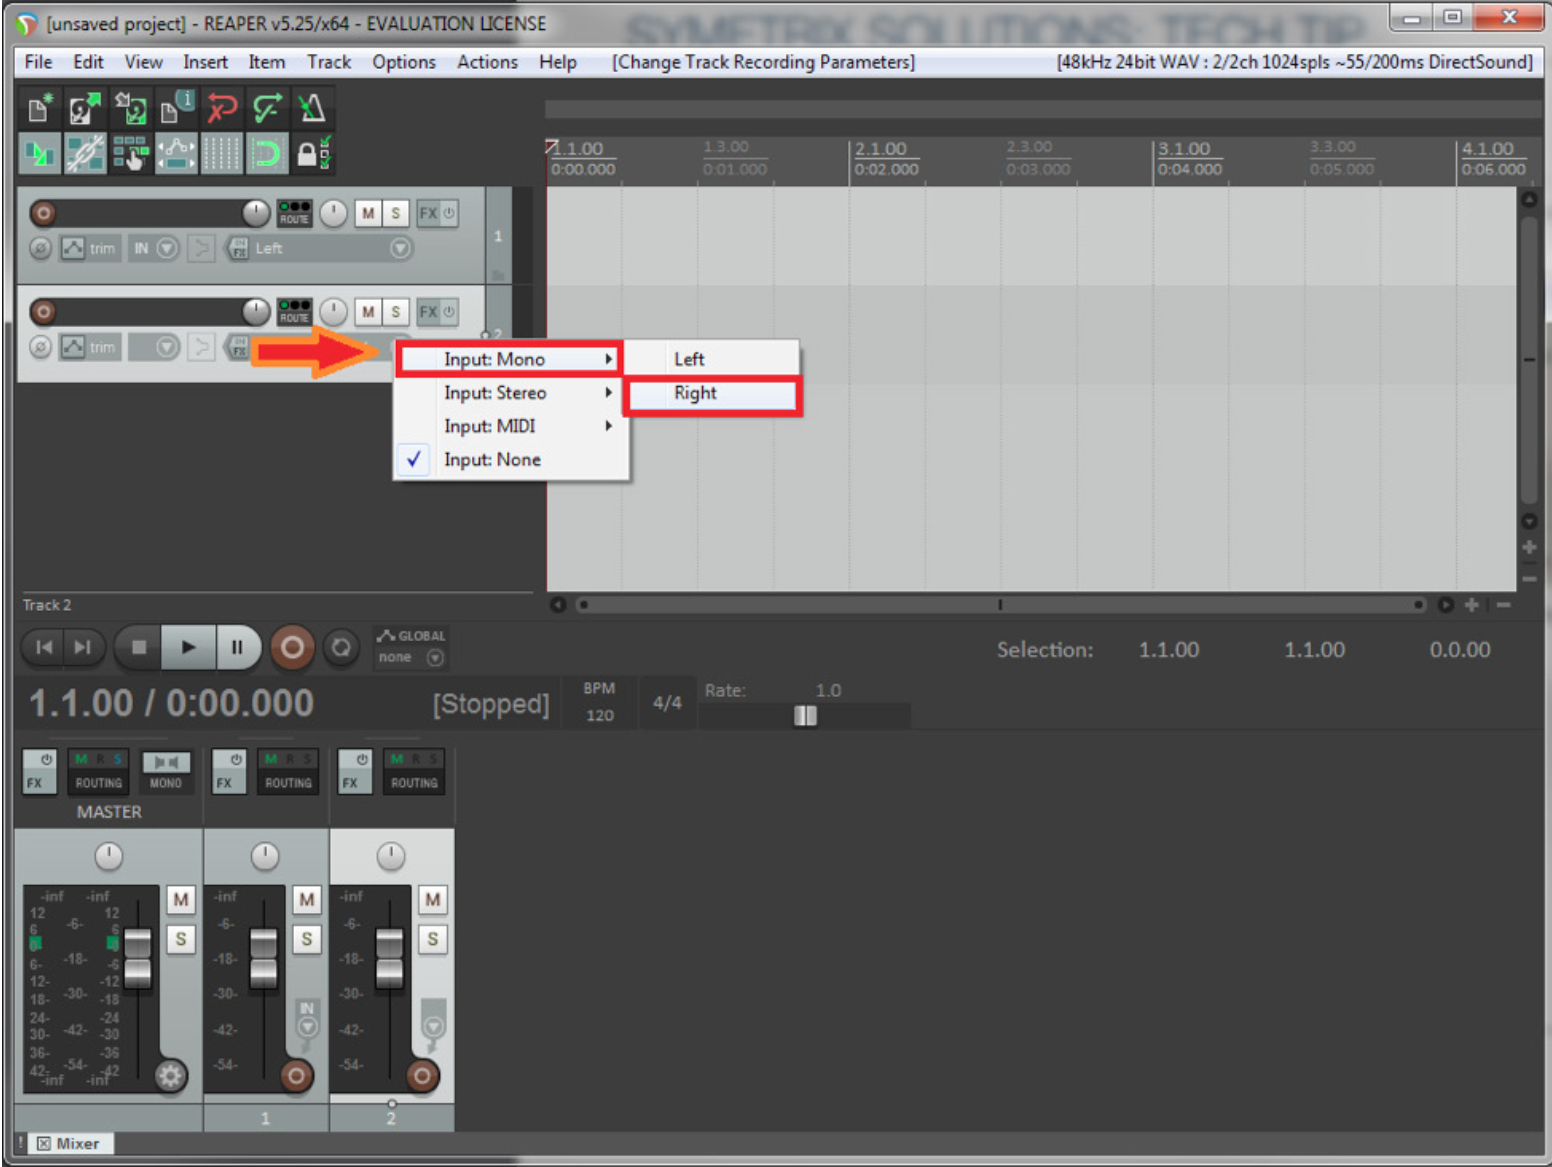
9) Select input source. Assign Input:Mono>Right to this track.
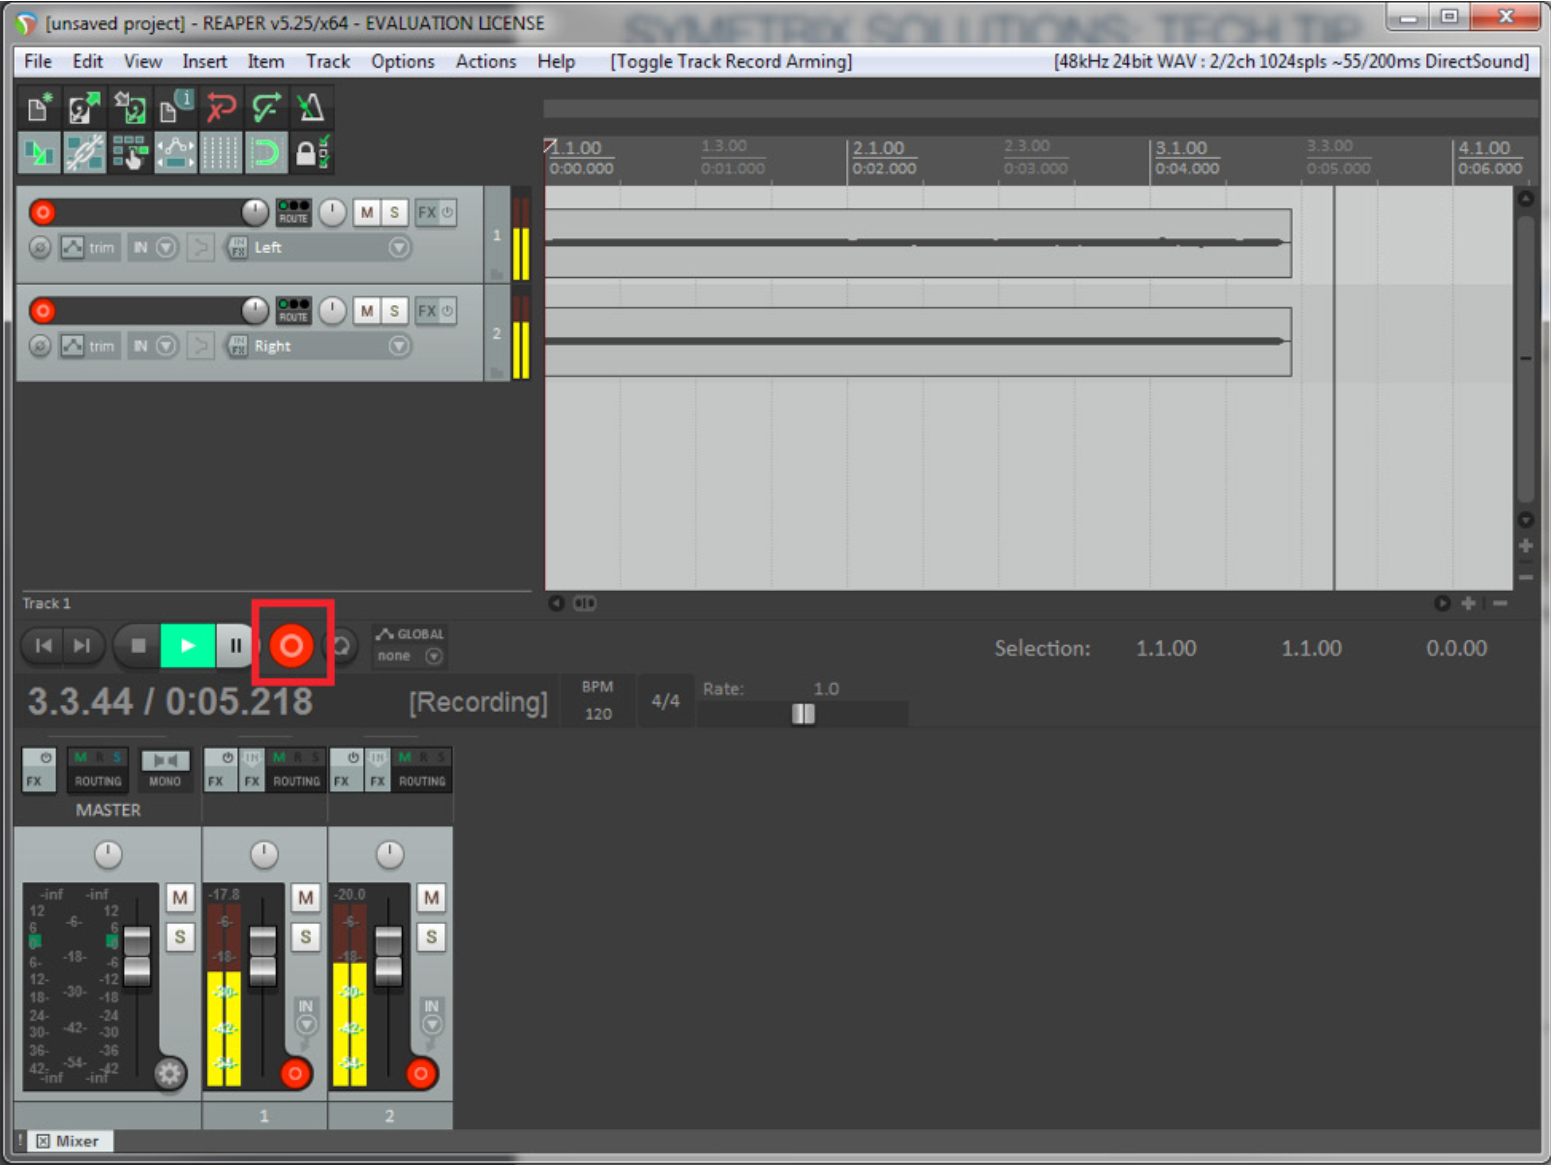
10) Select and Arm each track. You should now see your audio metering in the Record window.
11) Select Record.
12) You can now record the audio from the Dante Bus to your recording software.
Note: Most recording software use WDM for 2 channels/tracks only (left and right), while ASIO is used for multi-channel/track recording. So, if you only need to record in stereo or 2 channels/tracks WDM will be fine. If you need to record 3 or more channels/tracks use ASIO.