


-
Type
- Dante
- Networking
- Control
-
System Management
- Composer Management Software
- SymVue Screen Authoring
- AV-Ops Center Remote Monitoring
- ARC-WEB Control Interface Signal Processing
- D100 AVoIP DSP Server
- Radius NX AVoIP DSP
- Prism AVoIP DSP
- Edge AVoIP DSP
- DSP I/O Expansion Cards
- Jupiter DSP
- Zone Mix 761 DSP I/O Connectivity
- xIO Bluetooth Endpoints
- xIO XLR Endpoints
- xIO AVoIP DSP Audio Expanders Control Systems
- T-Series Touchscreen Controllers
- W-Series Controllers
- Control Server for Personal Devices
- xControl GPIO Expander
- ARC-Series Controllers
Mono Source Select and Volume Control for Jupiter using ARC-2e and ARC-WEB remotes
Type: Control
ARC remotes are a powerful and intuitive form of system control for systems using Symetrix DSPs. This Tech Tip will walk through setting up zone Source Select and Volume control for the Zone Mix 761 on an ARC-2e. The process is nearly identical for ARC-WEB.
Starting at the Zone Mix 761 software homepage, there are two main areas to focus on.
- Zones; these are where control parameters are located for source select and volume.
- Output RTE; this is where we connect signal flow from Zones to the analog outputs, effectively making each Zone a direct control for an analog output.
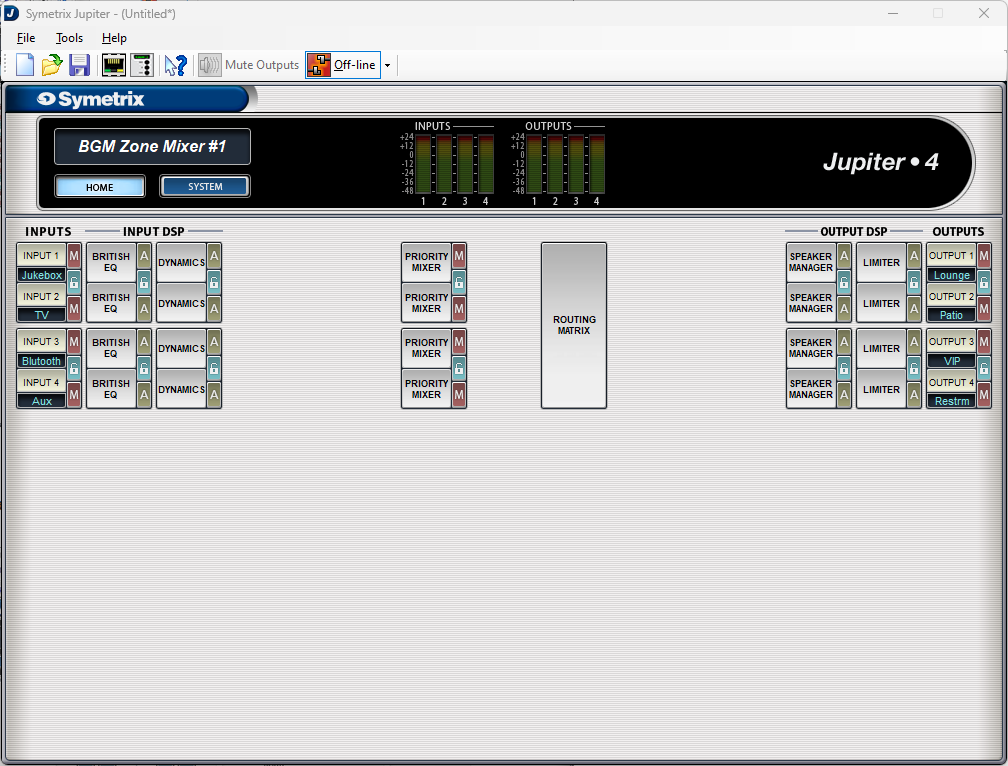
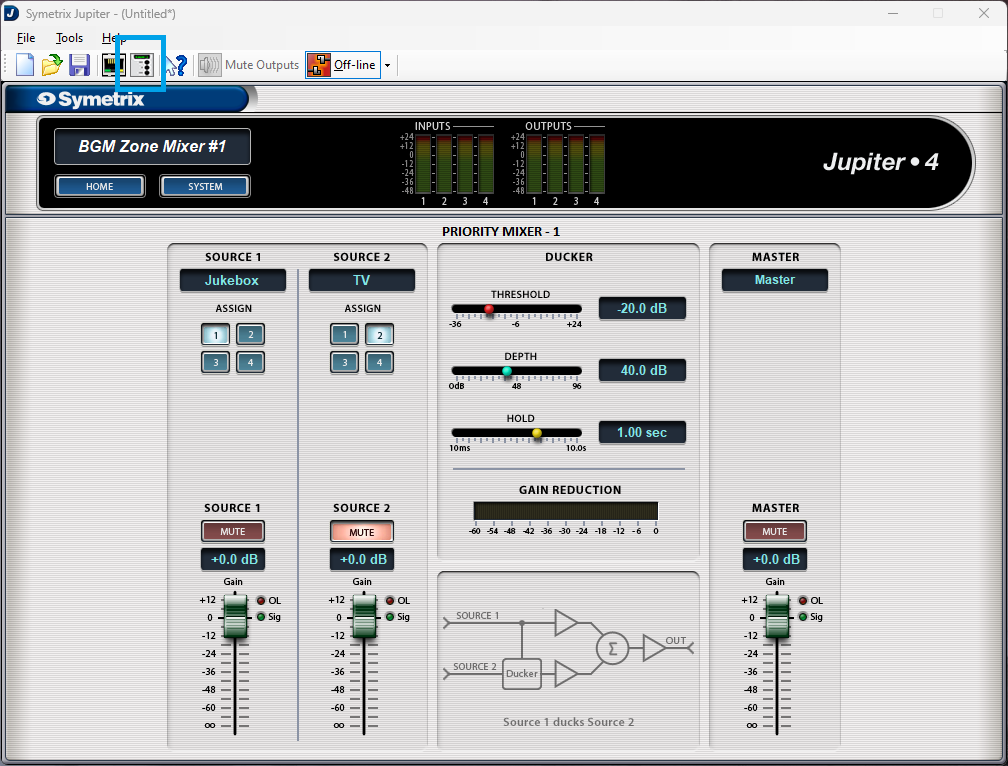
Open up Priority Mixer 1. Notice there are two Sources in this Priority Mixer, in fact every Priority Mixer will have two Sources.

For a mono source select function, Source 2 channel can be muted as it is not needed. Source 1’s Assign buttons will be the parameter we use to select the source input. The Ducker settings won’t come in to play here as we are not using Source 2. If the venue required a paging microphone or some other ducking purpose, the source with priority (microphone) would always be selected in Source 1 and we would control background music selection with Source 2.
The zone volume control can be assigned to either the Source 1 fader or the Priority Mixer Master fader. If the system has the chance of adding ducking at some point, the Master Fader maybe the better option for zone volume control.
Go back to Home and open up the Routing Matrix. Notice the default stair-step pattern.
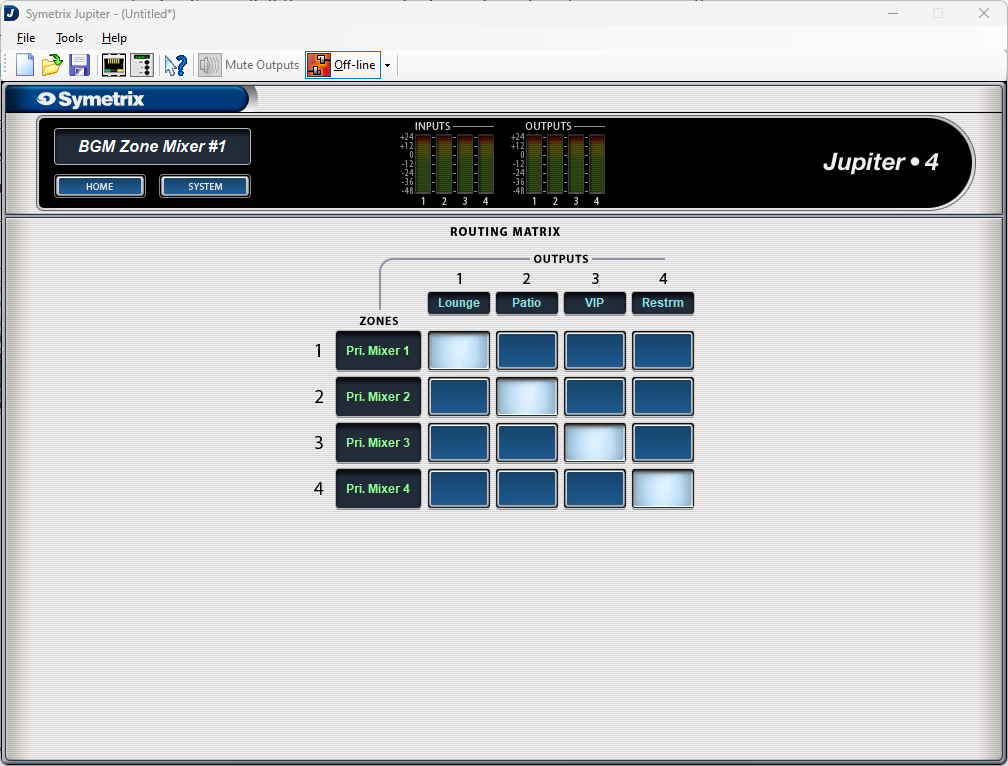
If the output channels are named, the routing matrix will automatically fill those in along the top row. The Zones column will be labeled “Zone 1, Zone 2, etc” by default. They have been relabeled here for explanatory purposes of this Tech Tip.
The Priority Mixer we just looked at feeds into what is labeled as Zone 1 by default, relabeled here as “Pri. Mixer 1”. Whatever is playing in Priority Mixer 1 then gets sent out analog Output 1. Priority Mixer 2 is sent to Output 2 and so on. These cross-points can be edited as necessary, but keep signal flow in mind. In this current state analog Input 1 (Jukebox) is selected in Priority Mixer 1 (Zone 1) which then gets fed to analog Output 1 (Lounge).
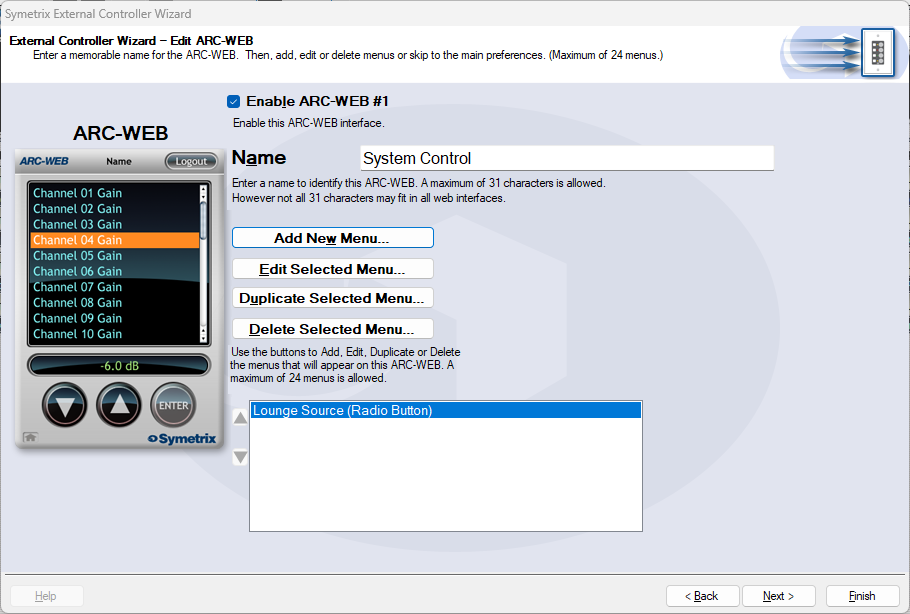
Open the External Control Wizard.
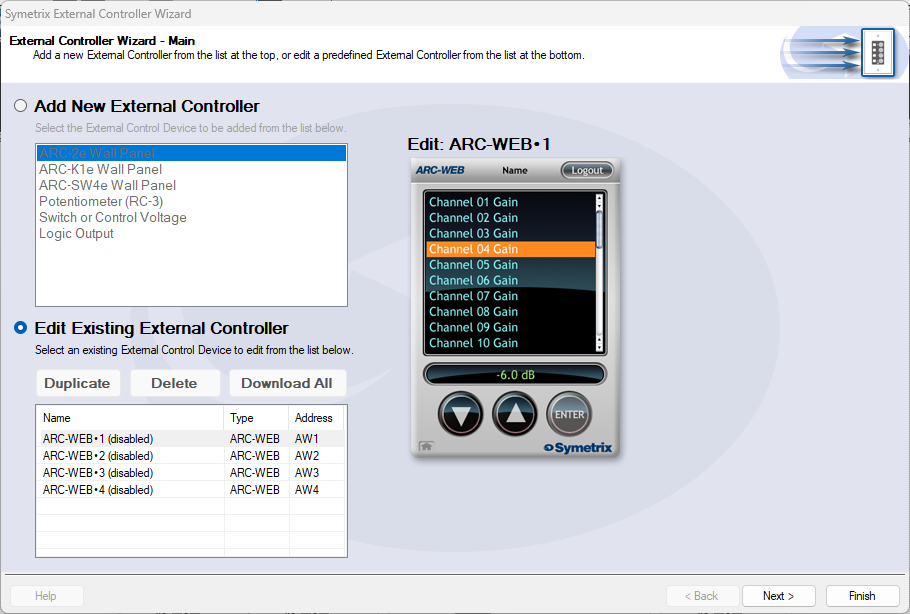
This example will program control for an ARC-WEB interface, but the process is nearly identical for the ARC-2e. Select Edit Existing External Controller, then select ARC-WEB 1, and click next.
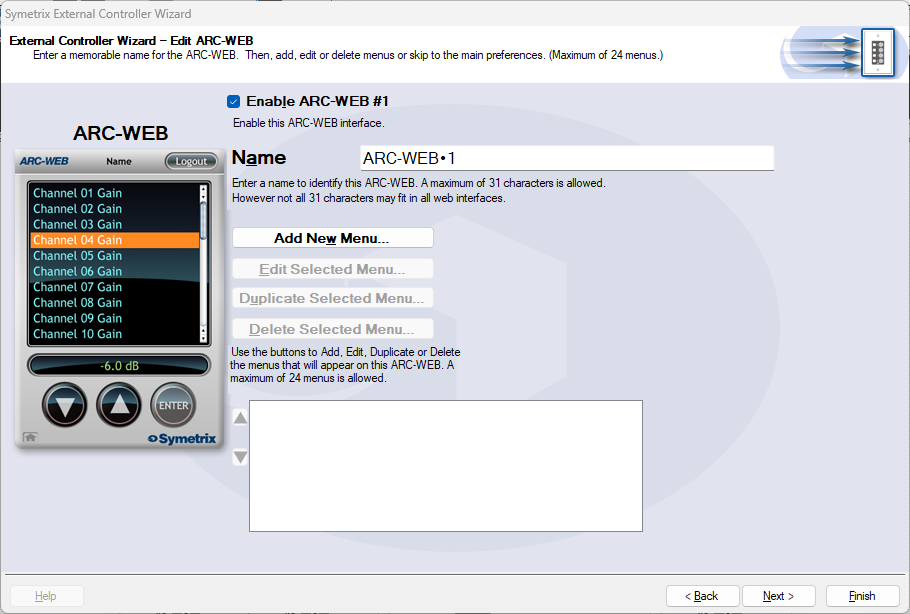
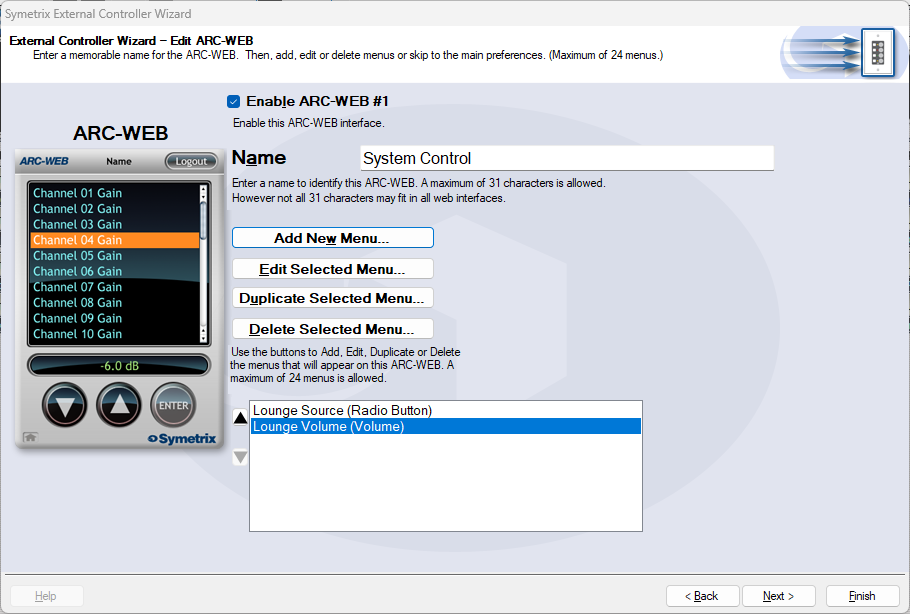
Check the Enable ARC-WEB #1 box at the top. The Name field is the default remote name, but can be edited appropriately. In this example, it will be named System Control.
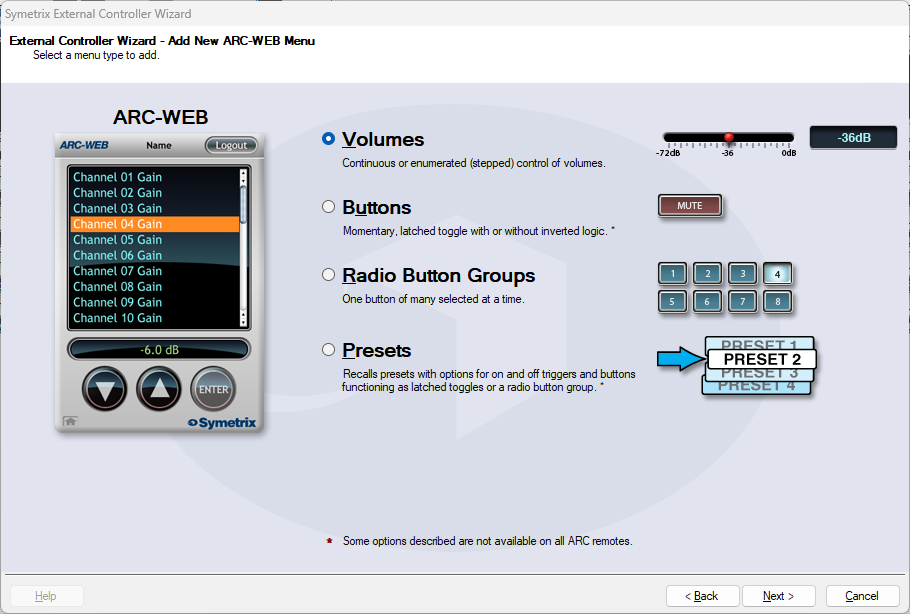
Click on Add New Menu.

Select Radio Button Groups. Notice the graphic on the right looks like the Priority Mixer assign buttons. Click next.
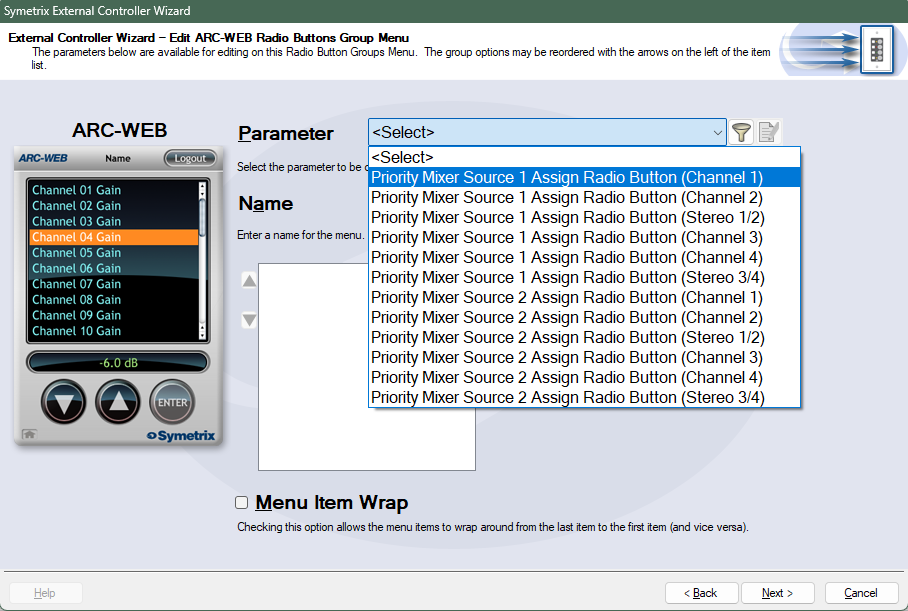
The Parameter drop-down is where the control will be assigned. Select Priority Mixer Source 1 Assign Radio Button (Channel 1).
- Channel 1 in this use case means analog Priority Mixer 1, Channel 2 means analog Priority Mixer 2, and so on.
- We are selecting the Source 1 Assign radio button group from Priority Mixer 1.
The Name setting can be customized accordingly. Here, it will be named Lounge Source.
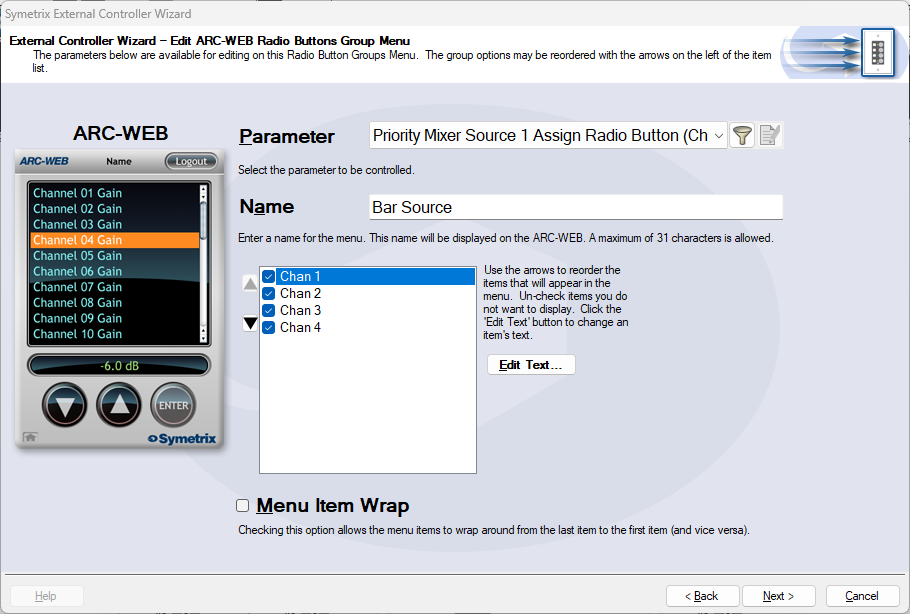
The channel list below the Name setting are all of the analog Input sources available. This is where input sources are included or not from Priority Mixer 1’s radio button control; in effect, which sources the Lounge is allowed to choose from.
These are labeled Chan 1-4, but are related directly to Inputs 1-4. In this case Chan 1 is Jukebox, Chan 2 is TV, and so on. Click Edit Text on the right to edit the channel names that will appear on the ARC-2e or ARC-WEB. You can also re-order the channels by clicking the up and down arrows.
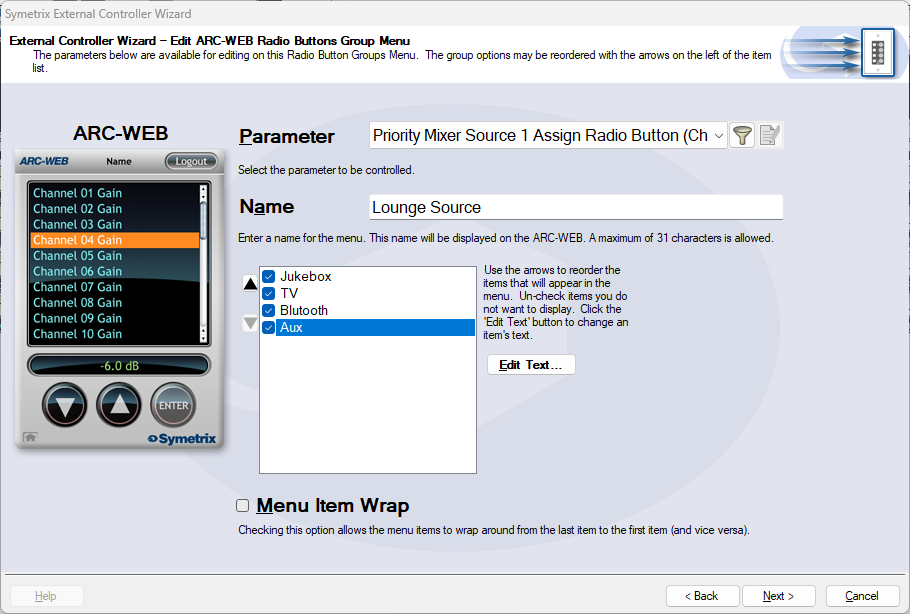
IMPORTANT NOTE: Even numbered Priority Mixer channel names will be opposite for every two in relation to this step of the External Control Wizard. This is the case to allow for programming stereo inputs source selection. This table helps explain how to match channels to actual inputs, and mitigate which channels need to be re-ordered to keep selections correct.
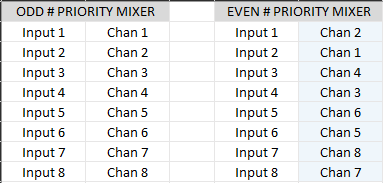
Notice that odd numbered Priority Mixer channels and inputs match up as expected. Even numbered Priority Mixers are reversed every two channels/inputs. In this case Chan 1 is Input 2, and thus Chan 2 would be named “Jukebox” and Chan 1 would be named “TV”. Re-order Channels according to the blue highlighted column above, then label according to the Input column just left. If this isn’t done, source selection will skip around seemingly randomly.
When finished labeling, click next.
We are now back at the home screen of ARC-WEB #1 where we can see the Lounge Source menu listed. We can now create a Volume control for Lounge. Click Add New Menu.
Choose Volumes and click Next.

There are two options here for how the control will act. In most cases Continuous will be selected for more precise control, but Enumerated is another way to offer simple intuitive control over volume. Click Next.
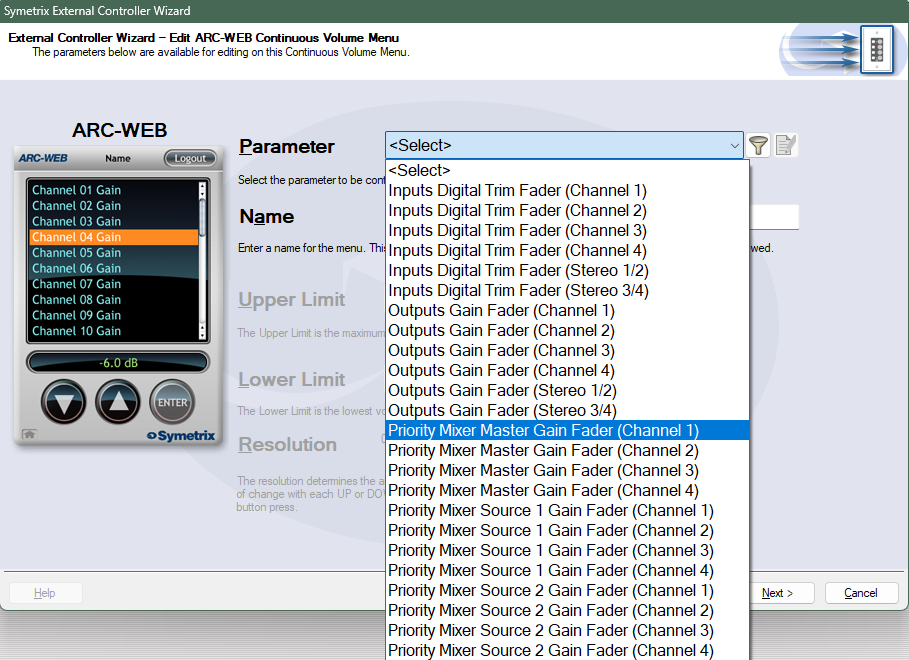
Select Priority Mixer Master Gain Fader (Channel 1). In this case Channel 1 means Priority Mixer 1, Channel 2 means Priority Mixer 2, and so on. This Tech Tip chooses the Master Gain Fader for the possibility of needing to take advantage of the ducking talked about earlier. If you prefer to control the Source fader itself, choose Priority Mixer Source 1 Gain Fader (Channel 1) – this would mean the Source 1 gain fader of Priority Mixer 1.
The control Name can be edited. In this example, it will be named Lounge Volume. The upper and lower limits will be left as default here, but you can edit them accordingly if desired. Click Next.
We now see Lounge Volume listed below Lounge Source on the ARC-WEB #1 home screen. Continue through to add controls for each other zone as desired, keeping in mind the Channel/Input order for even numbered Priority Mixers.
Once all menus have been created click Next through the available option(s). ARC-WEB will only offer access security while ARC-2e will offer other options related to the panel itself. The ARC-WEB will allow you to launch the ARC-WEB and view/test your work (must be online with Jupiter). The ARC-2e (and other ARCs) will eventually show a button option for “Simulate…”, which brings up a graphic representation of an ARC-2e, to view/test your work.
Note: Some parameters may not respond when in simulation mode. This is a known issue.