

-
Type
- Dante
- Networking
- Control
-
System Management
- Composer Management Software
- SymVue Screen Authoring
- AV-Ops Center Remote Monitoring
- ARC-WEB Control Interface Signal Processing
- D100 AVoIP DSP Server
- Radius NX AVoIP DSP
- Prism AVoIP DSP
- Edge AVoIP DSP
- DSP I/O Expansion Cards
- Jupiter DSP
- Zone Mix 761 DSP I/O Connectivity
- xIO Bluetooth Endpoints
- xIO XLR Endpoints
- xIO AVoIP DSP Audio Expanders Control Systems
- T-Series Touchscreen Controllers
- W-Series Controllers
- Control Server
- xControl GPIO Expander
- ARC-Series Controllers
Updating Firmware with Composer
Product:Composer Management Software
The purpose of this document is to provide information and set by step instructions for the proper firmware upgrade process. With each new release of Composer also comes new firmware for the hardware. Firmware upgrades can include upgrades made to Composer (i.e. modules and tools), bug fixes, and can be a very useful tool when troubleshooting a problem. The firmware version in the hardware must be matched with the version of Composer software being used. The correct firmware for the version of Composer you are using is always distributed with Composer and installed on the hard drive by Composer’s installer. If there is ever any doubt, follow these instructions to check the firmware version or to upgrade the firmware.
IMPORTANT: Do not attempt to perform a firmware upgrade over Wi-Fi, as this may ‘brick’ the DSP and require repair. It is also recommended to disable Windows Defender Firewall and have the PC obtain IP addresses automatically.
Be sure to create a backup of the site file on a PC before attempting a firmware upgrade.
Part I. Initiate Firmware Update
1. Ensure the Symetrix Digital Signal Processor (DSP) is connected to the PC’s subnet. This can be accomplished one of two ways: Option A. Direct Connection: plugging the PC directly into the DSPs Control (Ethernet) Port. Option B. Network Switch: with both the host Computer (running Composer) and DSP connected to a Network switch. Set the PC’s Network Interface Card (NIC) to automatically obtain IP addresses.
1. To change the IP configuration in Windows OS: type “ncpa.cpl” in the Start Menu search bar which should query a Control Panel Item: Network Connections.
2. Right click on the “Ethernet” NIC, select “Properties”. Once in the Ethernet Properties, select “Internet Protocol Version 4 (TCP/IPv4)” from the connection list, and then click the “Properties” box beneath it.
3. Select “Obtain an IP address automatically” which utilizes Dynamic Host Control Protocol if that is available on the control network. In specific cases, a Static IP address must be set in the same subnet as the DSP. The DSP’s IP address can be found on the front panel display by navigating through the menus with the arrow buttons.
2. Locate the DSP in Composer. The unit in the site file will be successfully located when a green check mark appears on the bottom left corner of the unit module that has been dragged in from Composer’s Toolkit (see Figure 1).
3. Right click on the device module, select “Unit Properties…” (see Figure 2), and under the left middle section of the “[DSP Model] Properties” window (see Figure 3) labeled “Firmware”, select “Upgrade Firmware…”
4. This should bring up the “Upgrade Firmware/Hardware Settings” window. (see Figure 4)
5. Select the “Upgrade…” option (see Figure 4) under the “Composer Firmware File” option.
6. An open file dialog box will appear and by default it should direct to this folder: C:Program Files (x86)SymetrixComposer 8.3Upgrade. Select the appropriate CFW file and click “Open”. The update will stall at 25% momentarily as this is when data is transferring over File Transport Protocol (FTP) Port 20. However, it should last no more than 15-20 seconds and continue. Once complete, a dialog box will appear confirming success.
7. It is best practice to power-cycle the unit only once the upgrade is complete by unplugging/re-plugging the power cable on the back and re-pushing any site file programming to the DSP.
Note: The above steps are also used when upgrading T series touch panels and W series remotes.
Part II. Upgrading Dante Expanders
1. Right click the Dante expander module and select “Unit Properties”.
2. Select “Upgrade Firmware…”.
3. The “Upgrade xIn, xOut or xIO Firmware” window will appear. This window displays the currently installed User Firmware and Dante Kernel Firmware versions. New versions can be selected from the File Explorer by clicking either of the respective “Change Version…” buttons (see Figure 5).
4. Clicking the “Upgrade Firmware” button (see Figure 5) will upgrade both the User Firmware and the Dante Kernel Firmware to the versions selected in Step 3.
5. Once the firmware upgrade has completed, a dialog box will appear confirming success.
Note: A Composer-enabled DSP must be present and located in the site file and connected to the Dante Expander via the Dante network in order to upgrade Dante Expander firmware.
Part III. Upgrading Multiple Design Units Simultaneously
From the “Upgrade Firmware/Hardware Settings” window (see Figure 4), all design units in the site file except ARC and Dante Expander units can be upgraded at once using the top button: “Auto Upgrade All Design Units…”
Note: It is recommended to upgrade one design unit at a time in the event of a failure. Otherwise, none of the units in the site file will upgrade and there will not be a dialog box indicating the unit that is unable to complete the upgrade. Upgrading individually is also advised for troubleshooting as it completely reimages the firmware while Auto Upgrade will only update the files that it needs to.
Part IV. Common Issues/Troubleshooting
· Firmware update fails after reaching 25%: The issue is likely related to the network as the FTP requests are failing to reach the DSP.
Directly connect the PC into the DSP’s Control Port and attempt the upgrade without the presence of a network switch.
· Any dialog box indicating the firmware update failed:
In rare cases, the error is due to Composer losing communication with the DSP when it is rebooting and taking longer to come online than the timeout period Composer is expecting. Close the properties window and re-open it to verify if the firmware updated. Otherwise, attempt to power cycle the device. The update may have been successful before and may show as “current” in the “[DSP Model] Properties” window (see Figure 3) after the device reboots.
If the version is not “Current”, check to see if the desired firmware upgrade is older than one generation of the Composer version. It is best practice to install an older version of Composer and slowly upgrade the firmware to match it versus upgrading to the most current version (this may fail or ‘brick’ the device).
If the update continues to fail, and a local back-up of the Composer site file is available, factory reset the DSP using the following steps and then re-push the site file:
1. Pull power from unit.
2. Find the recessed button on the back of unit – for Composer based DSPs it will be by the RS-232 or Ethernet Ports; for Jupiter or Zone Mix, it will be by the ARC port; for xIO Bluetooth, it is on the left side of the unit.
3. Hold the button in with a pin or a pen.
4. Re-apply the power plug while continuing to hold button.
5. Count 20-25 seconds with the button pushed in while the unit boots up.
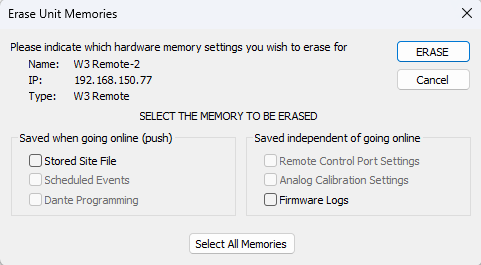
· Erase Unit Memories: The Erase Unit Memories function is provided in the Unit Properties (see Figure 3) for troubleshooting purposes. It provides a handy way to delete certain parameters stored in the hardware. The parameters that can be selected to erase either all or individually are: Stored Site File, Scheduled Events, Accessory Serial Port Settings, Analog Calibration Settings, and Firmware Log Settings (see Figure 6).
· If a Dante device will not accept a firmware upgrade, be sure the device has not been locked via Dante Controller. This is found in Dante Controller > Device View > Lock icon.
Figure 1. A green check mark confirms that the DSP is located.
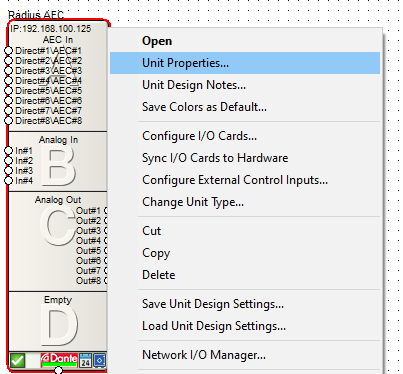
Figure 2. “Unit Properties” menu option appears after right clicking the DSP module.
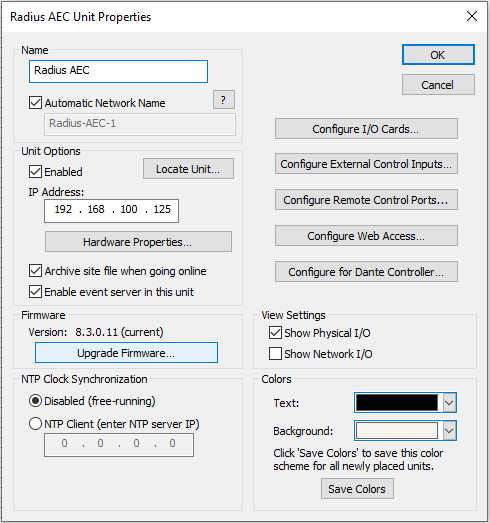
Figure 3. DSP Unit Properties – “Upgrade Firmware…” can be found here.
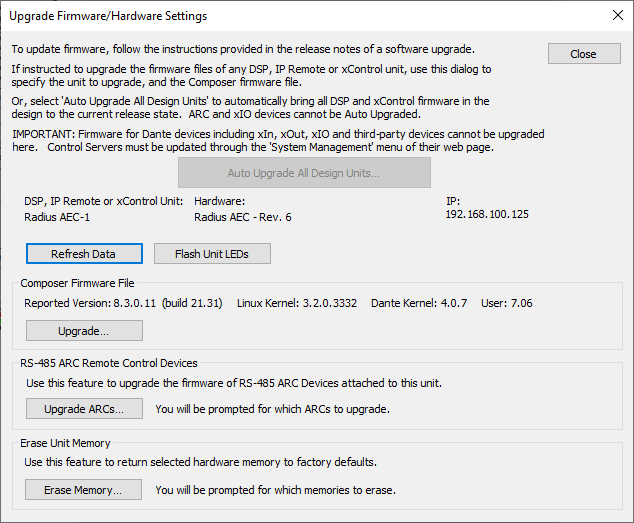
Upgrade Firmware/Hardware Settings – Includes “Auto Upgrade All Design Units…” and “Upgrade…” option for a single DSP.
Figure 5. Dante Expander Firmware Upgrade Window – Both the User Firmware and the Dante Kernel Firmware can be upgraded simultaneously here.
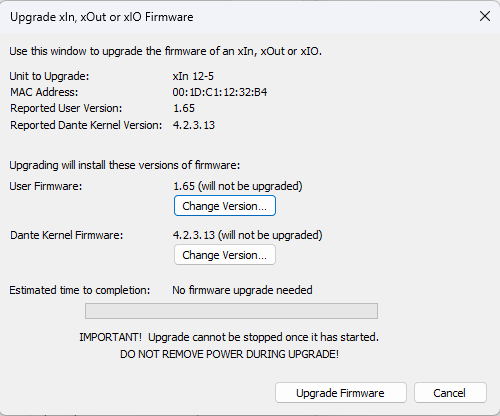
Figure 6. Erase Unit Memories – Can be used to troubleshoot hardware by restoring certain hardware properties to their factory state.