


-
Type
- Dante
- Networking
- Control
-
System Management
- Composer Management Software
- SymVue Screen Authoring
- AV-Ops Center Remote Monitoring
- ARC-WEB Control Interface Signal Processing
- D100 AVoIP DSP Server
- Radius NX AVoIP DSP
- Prism AVoIP DSP
- Edge AVoIP DSP
- DSP I/O Expansion Cards
- Jupiter DSP
- Zone Mix 761 DSP I/O Connectivity
- xIO Bluetooth Endpoints
- xIO XLR Endpoints
- xIO AVoIP DSP Audio Expanders Control Systems
- T-Series Touchscreen Controllers
- W-Series Controllers
- Control Server for Personal Devices
- xControl GPIO Expander
- ARC-Series Controllers
Using AES67 with Symetrix Dante-enabled DSPs
Product:Composer Management Software
Product:Edge AVoIP DSP
Product:Prism AVoIP DSP
Product:Radius NX AVoIP DSP
Product:D100 AVoIP DSP Server
Type: Networking
The purpose of this Tech Tip is to provide information and instruction on using AES67 with Symetrix Dante-enabled DSPs. The AES67 standard provides interoperability between different forms of AoIP (Audio over IP). AES67 is not a networking solution in and of itself, but rather a group of interoperability specifications for connecting media streams. AES67 is supported by various IP-based audio networking systems such as Dante, Ravenna, Livewire and Q-LAN.
Because Dante supports AES67, this allows Symetrix Dante-enabled DSPs to receive and transmit audio with other IP-based audio networking systems, Q-LAN as an example. When using Symetrix Dante enabled DSPs with AES67, there a few key points to keep in mind:
- Symetrix Dante-enabled DSPs are compatible with AES67, but are not AES67 specific hardware.
- AES67 stream assignments are handled by the receiving device
- AES67 streams will only appear as a transmitter in Dante Controller.
- AES67 transmit streams from a Symetrix Dante-enabled DSP will NOT be assignable in Dante controller.
- Here is a link to set up AES67 receive flows with Q-SYS
- AES67 is capable of unicast and multicast communication, however Dante’s implementation of AES67 currently only supports multicast.
- When two Dante-enabled devices are passing audio between each other they will always use Dante for the communication, regardless of AES67 streams.
- Audinate’s Ultimo chipset does not currently support AES67
- Here is a link to the AES67 standard
AES67 Receive Stream
Here are the instructions for creating AES67 receive buses, using the generic Network Receive Modules (This example uses a Radius AEC and QSC Q-SYS Core 250i)
aes 1
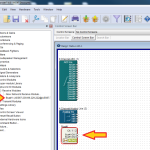
1. From the Toolkit, add a Radius AEC to the Site View page.
aes 2
2. Open the Design View page by double-clicking the Radius AEC.
aes 3
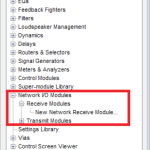
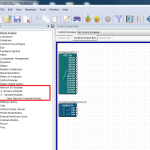
3. From the Toolkit, expand Network I/O Modules, then expand Receive Modules.
aes 4
4. Double-click or drag in a New Network Receive Module.
aes 5
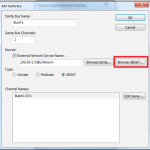
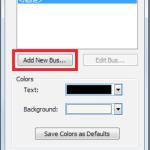
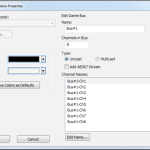
5. The Network Receive Module Properties window will open automatically. Click the button to “Add New Bus.”
aes 6
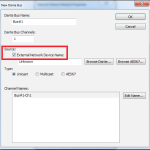
6. Change the type to AES67.
aes 7
7. Click the “Browse AES67” button.
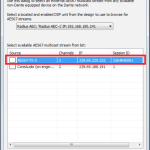
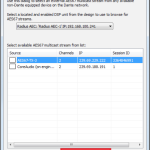
aes 8
8. Select the desired AES67 multicast stream from the list.
aes 9
9. Click the “Select AES67 Stream” button.
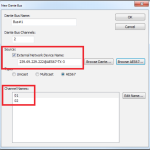
aes 10
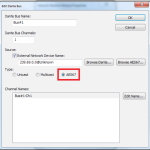
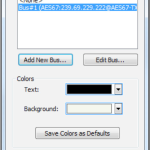
10. The New Bus window is now updated with the AES67 stream information (device network name and channel names).
11. The new AES67 receive bus is available in the Network Receive module Properties window.
12. Click Ok. The new receive bus has now been created.13. Push the site file and Composer will make the AES67 to Dante subscriptions.
13. Push the site file and Composer will make the AES67 to Dante subscriptions.
AES67 Transmit Stream
Here are the steps to create AES67 transmit streams:
aes 11
1. Open the site file to the Design View page.
aes 12
2. From the Toolkit, expand Network I/O Modules, then expand Transmit Modules.
aes 13
3. Add a New Network Transmit Module. The Network Transmit Module Properties window will open.
aes 14
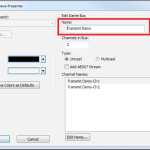
4. Edit the name of the transmit bus. Note: Naming of transmit buses is very important for organization.
aes 15
5. Select the number of channels in the transmit stream.
aes 16
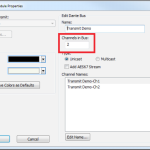
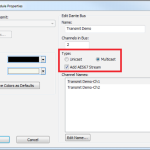
6. Select the transmit bus type.
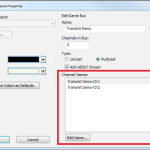
7. Name the individual transmit channels.
8. Click OK and the transmit bus will be added to the site file.
6. Select the transmit bus type.
7. Name the individual transmit channels.
8. Click OK and the transmit bus will be added to the site file.