


-
Type
- Dante
- Networking
- Control
-
System Management
- Composer Management Software
- SymVue Screen Authoring
- AV-Ops Center Remote Monitoring
- ARC-WEB Control Interface Signal Processing
- D100 AVoIP DSP Server
- Radius NX AVoIP DSP
- Prism AVoIP DSP
- Edge AVoIP DSP
- DSP I/O Expansion Cards
- Jupiter DSP
- Zone Mix 761 DSP I/O Connectivity
- xIO Bluetooth Endpoints
- xIO XLR Endpoints
- xIO AVoIP DSP Audio Expanders Control Systems
- T-Series Touchscreen Controllers
- W-Series Controllers
- Control Server
- xControl GPIO Expander
- ARC-Series Controllers
-
Type
- Dante
- Networking
- Control
-
System Management
- Composer Management Software
- SymVue Screen Authoring
- AV-Ops Center Remote Monitoring
- ARC-WEB Control Interface Signal Processing
- D100 AVoIP DSP Server
- Radius NX AVoIP DSP
- Prism AVoIP DSP
- Edge AVoIP DSP
- DSP I/O Expansion Cards
- Jupiter DSP
- Zone Mix 761 DSP I/O Connectivity
- xIO Bluetooth Endpoints
- xIO XLR Endpoints
- xIO AVoIP DSP Audio Expanders Control Systems
- T-Series Touchscreen Controllers
- W-Series Controllers
- Control Server
- xControl GPIO Expander
- ARC-Series Controllers
ARC-WEB Control Interface Tech Tips
ARC remotes are a powerful and intuitive form of control for systems using Symetrix DSPs. This Tech Tip will walk through setting up stereo Source Select and Volume control for the Jupiter on an ARC-WEB for the BGM Zone Mixer app. The process is nearly identical for ARC-2e.
Note: this set up assumes stereo output as well.
Looking at the home page for the BGM Zone Mixer we will be focusing on two major sections.

The Routing Matrix:

And the Priority Mixers:

The channels have already been labeled for this tech tip and we can see that there are two stereo inputs and two stereo outputs; noted as L/R 1, L/R 2, as well as Out L/R 1 and Out L/R 2 respectively.
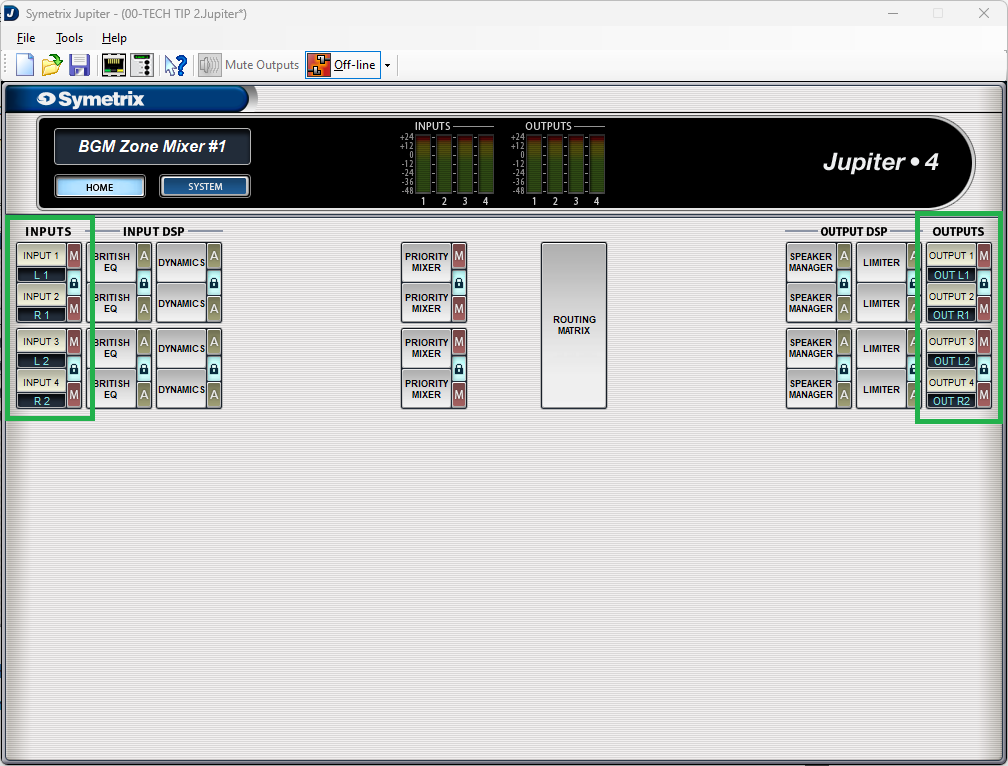
Also notice that all of the “lock” buttons have been engaged, locking channels 1 and 2, and 3 and 4. This is key to getting the proper control for stereo source select and volume control.
Open up Priority Mixer 1. Notice that the title of this page says “Priority Mixer 1/2”. This is noting that Priority Mixers 1 and 2 are linked, so actions in one affect the other.
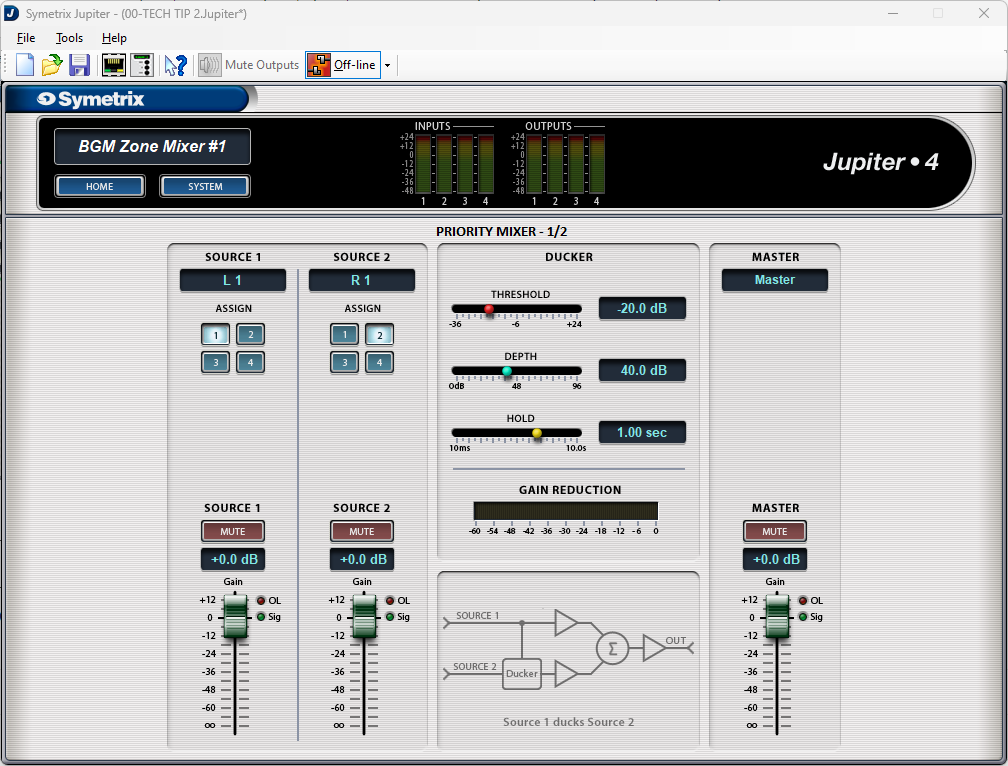
Note that Source 1 assign button has input 1 (L1) selected and its fader is at 0dB (we won’t be focusing on Source 2 in this Tech Tip). Now open up Priority Mixer 2.

We see that it has the same page name, Priority Mixer 1/2, and that the fader position is the same at 0dB, but the assign button is set to input 2 (R1). This represents that Priority Mixer 1 has input 1 (left) selected and Priority Mixer 2 has input 2 (right) selected. Change the assign button to input 4 and move the fader to the Off position. Now go back and look at Priority Mixer 1.

We see that the assign button has changed to input 3 (L2) and the fader has moved from 0dB down to the off position. This is what linking the two channels does.
Note: Odd number priority mixers should only select odd numbered assign buttons, while even numbered priority mixers should only select even numbered assign buttons. Reversing these will technically work, but the other locked priority mixer will do the opposite. For example, if priority mixer 1 selected input 2, then priority mixer 2 would select input 1.
Now that we have an understanding of how the source selection works within the priority mixers, go back to the home page and open the Routing Matrix.
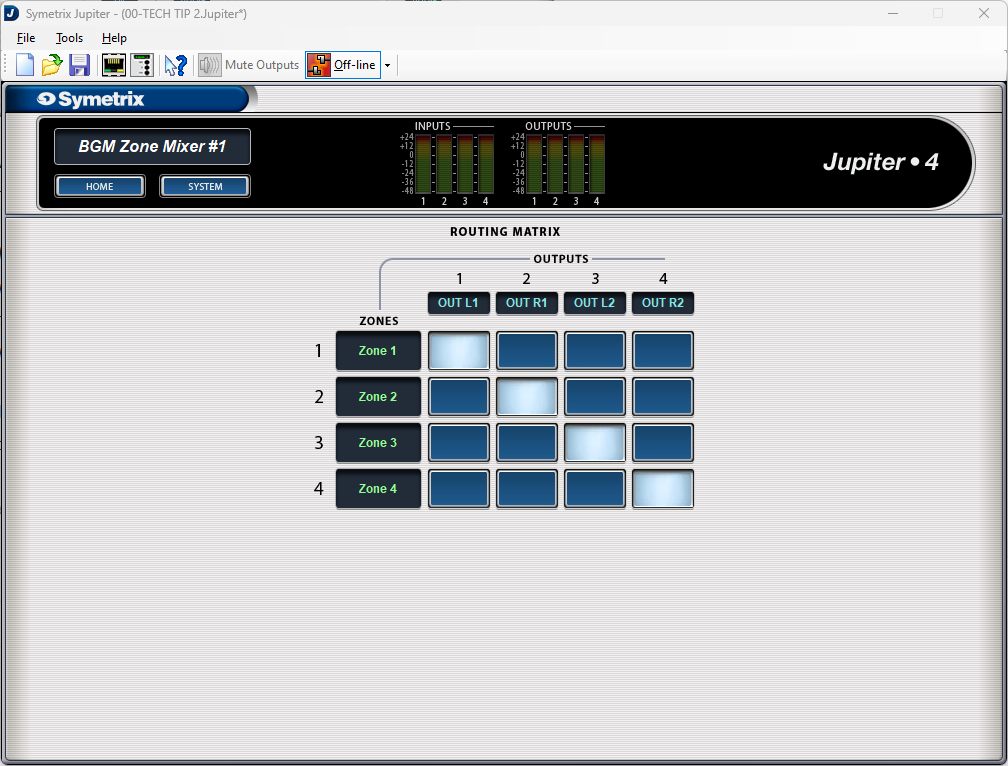
Notice that there are Zones labeled that connect to outputs through cross-points. These zones relate directly to the priority mixers; zone 1 is priority mixer 1, zone 2 is priority mixer 2, and so on. With the stair-step pattern of the cross-points, we can then say that Priority Mixer 1 is Zone 1 which is Output 1. The same for Priority Mixer 2, Zone 2, and Output 2, and the rest. For ease, you are welcome to relabel the zones to Priority 1, 2, and so on.
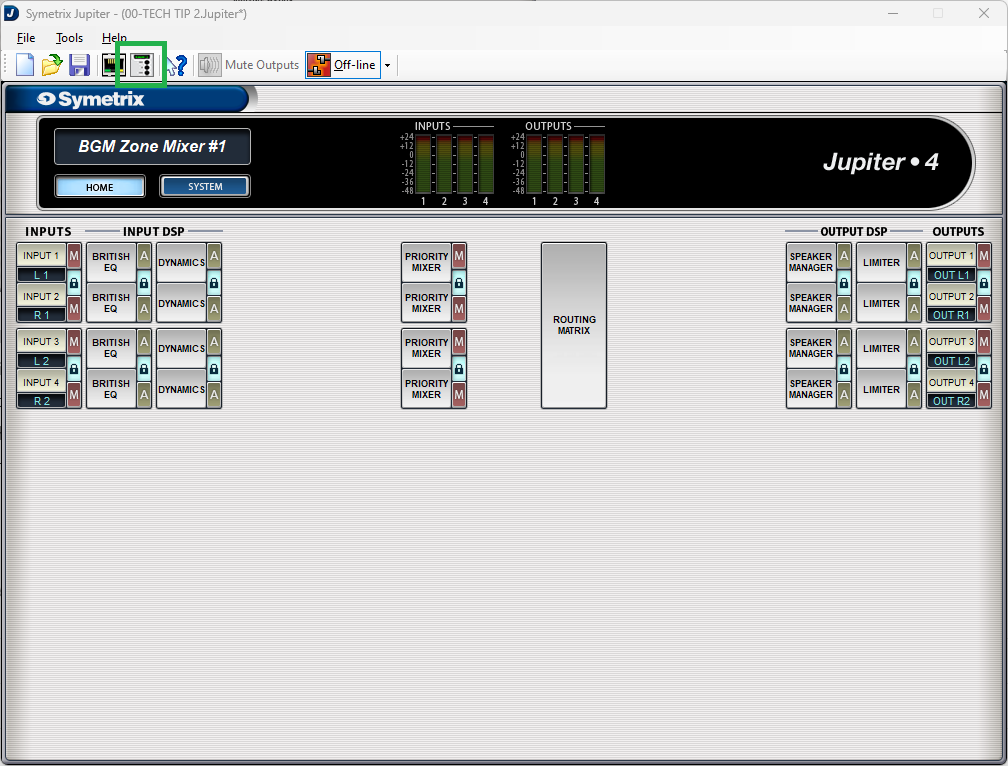
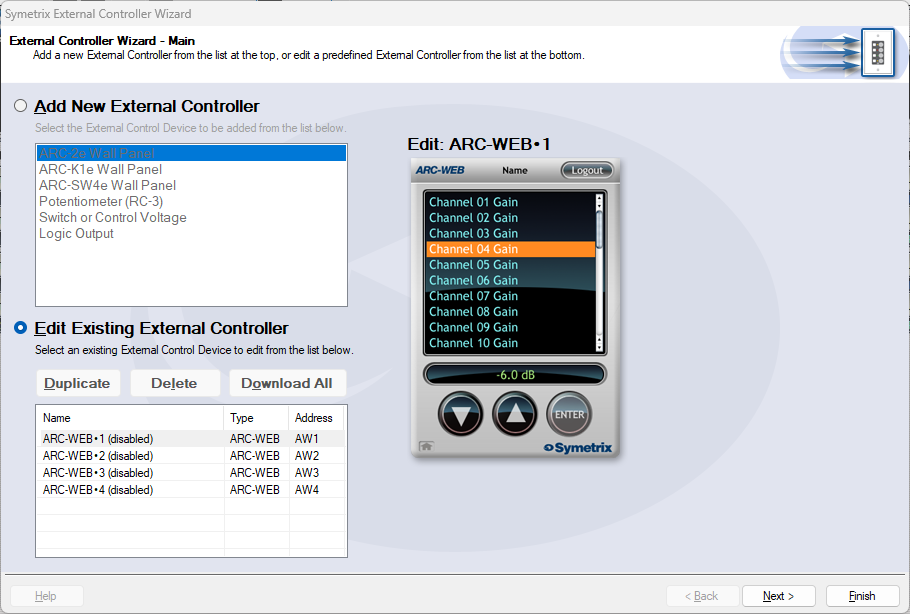
Now let’s set up the source select control. Go back to the home page and open up the External Controller Wizard.
Select Edit Existing Controller, highlight an available ARC-WEB and click Next.
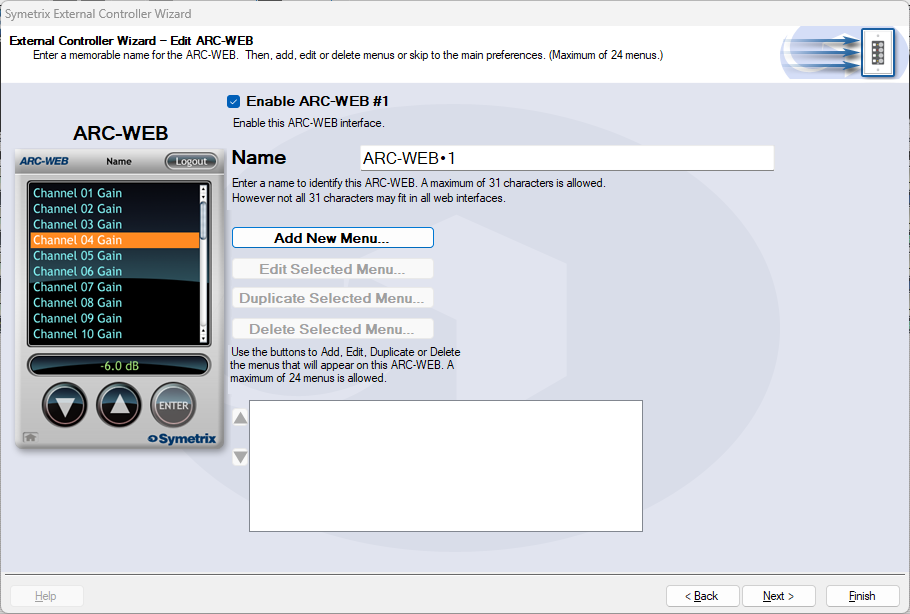
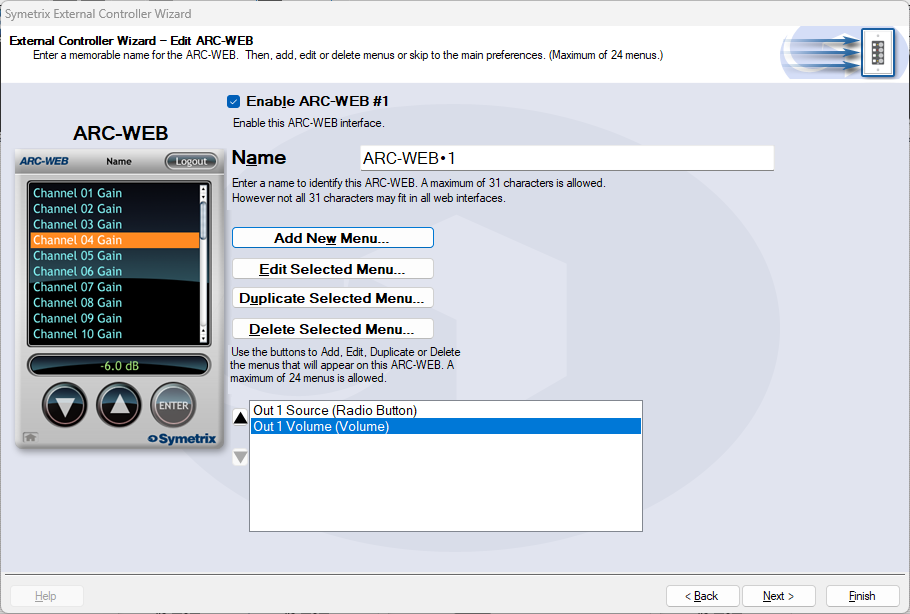
Enable the ARC-WEB at the top, rename the menu if necessary, and click Add Menu.
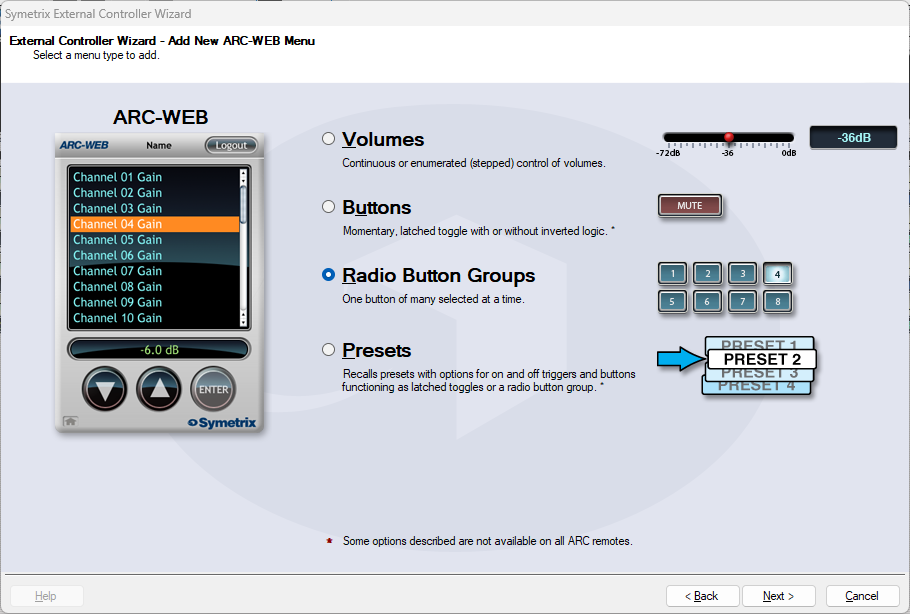
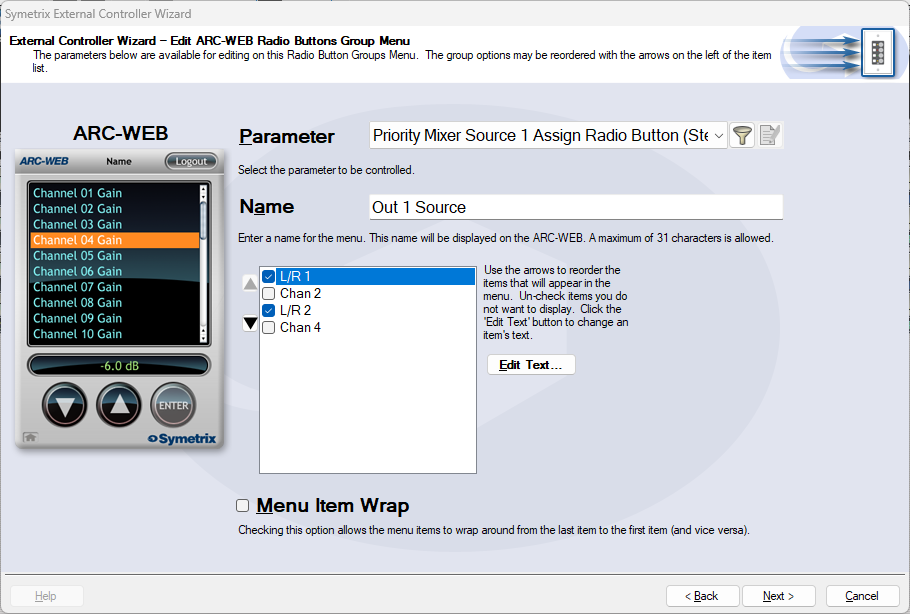
Select Radio Button Groups and click next.
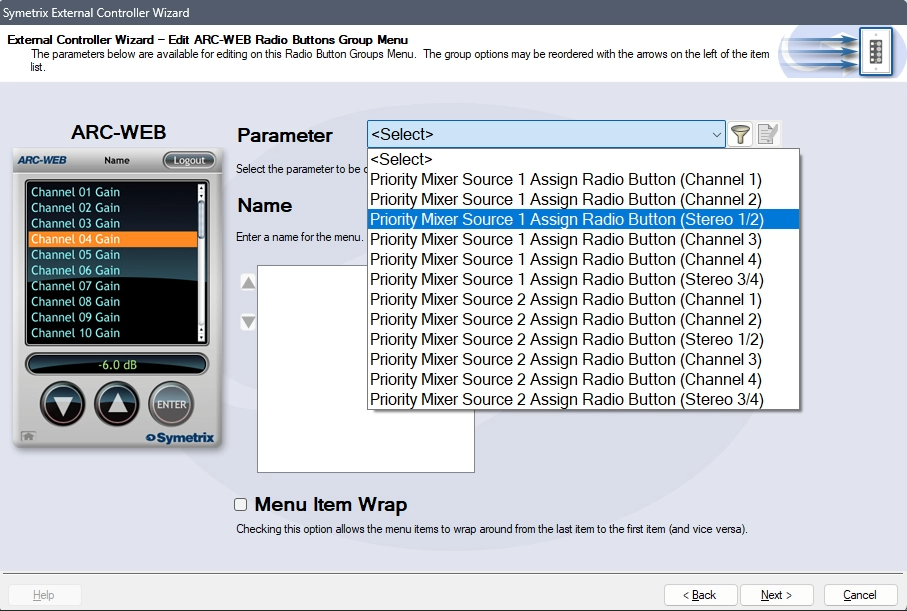
In the Parameter drop-down, select Priority Mixer Source 1 Assign Radio Button (Stereo 1/2). This will tell the Jupiter software that the source select will act in unison between Priority Mixers 1 and 2.
Name the menu appropriately. Remove options 2 and 4 from the channel list. This will prevent someone from accidentally reversing some inputs. In effect, there wouldn’t likely be a critical failure if this happened, however it is redundant and unnecessary to allow the Left audio channel to be in the Right output channel, and vice versa.
Re-name Chan 1 and 3 appropriately. In this case we’ll just use L/R 1 and L/R 2, but this could be a bluetooth source, third-party media player, or other stereo source. Since the Priority Mixers are acting together, Chan 2 and 4 are not necessary. Then click next.
We are brought back to the menu home page. Click Add New Menu to add a Volume Control. This time, choose volumes and click next.

Select Continuous or Enumerated appropriately and click next.
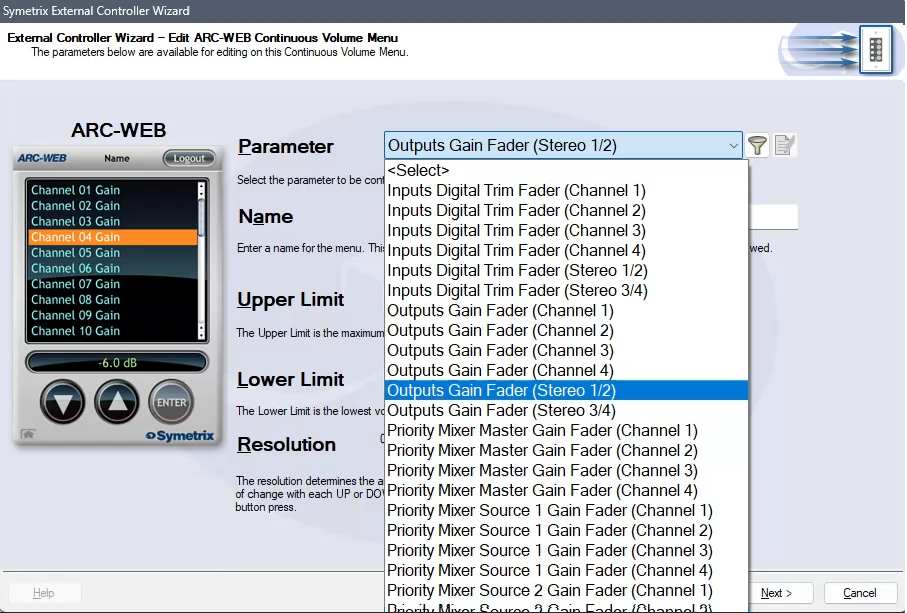
In the Parameter drop-down, select Outputs Gain Fader (Stereo 1/2). This will control the two gain faders for analog Outputs 1 and 2.
Note: While this is not the recommended parameter to control zone volume (as it is post-limiter and can put the sound system at risk of being overdriven with signal), there is not currently a way to control the faders from two Priority Mixers with ARC-WEB or ARC-2e by selecting one of them above. Consider setting the upper limit to the output fader control to prevent the overdriving of the amps/speakers downstream.
Name the menu and set the limit parameters appropriately and click next.

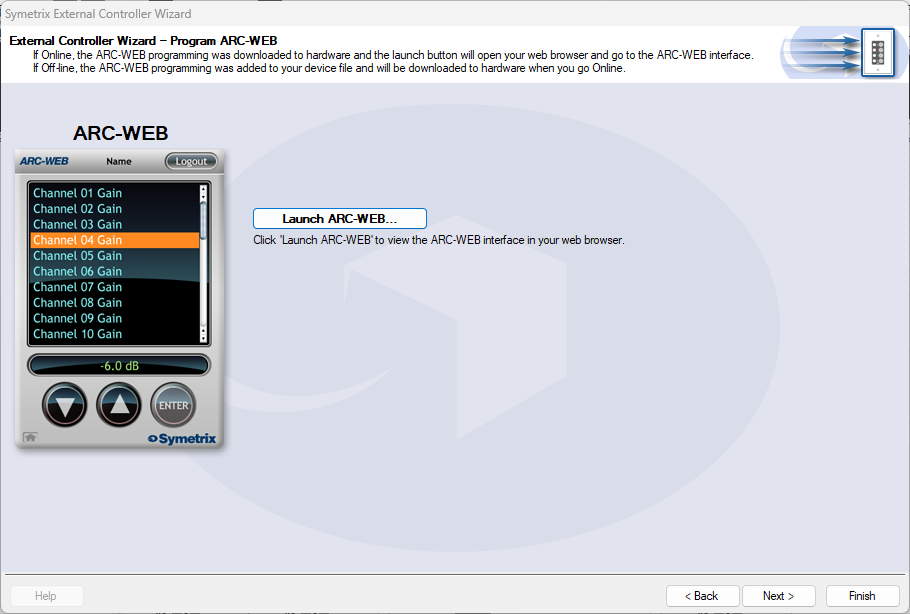
We are again brought back to the menu home page with two menus listed for source and volume control. Now we can test our work by clicking next and setting parameters along the way, until we arrive at the page that allows us to Launch ARC-WEB.
Click launch and a Browser window should open with your ARC-WEB where you can test the source selection and volume control. You must be online with the Jupiter DSP to test this programming. Programming for ARC-2e will allow for a simulator interface that can be tested with.
ARC remotes are a powerful and intuitive form of system control for systems using Symetrix DSPs. This Tech Tip will walk through setting up zone Source Select and Volume control for the Zone Mix 761 on an ARC-2e. The process is nearly identical for ARC-WEB.
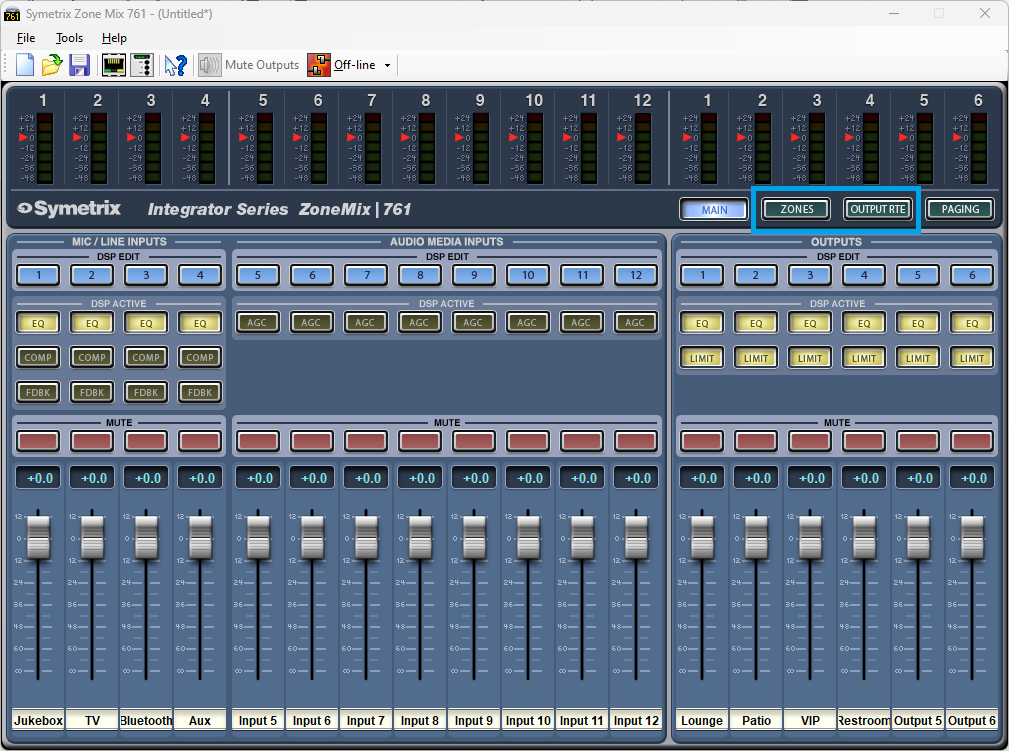
Starting at the Zone Mix 761 software homepage, there are two main areas to focus on.
- Zones; these are where control parameters are located for source select and volume.
- Output RTE; this is where we connect signal flow from Zones to the analog outputs, effectively making each Zone a direct control for an analog output.
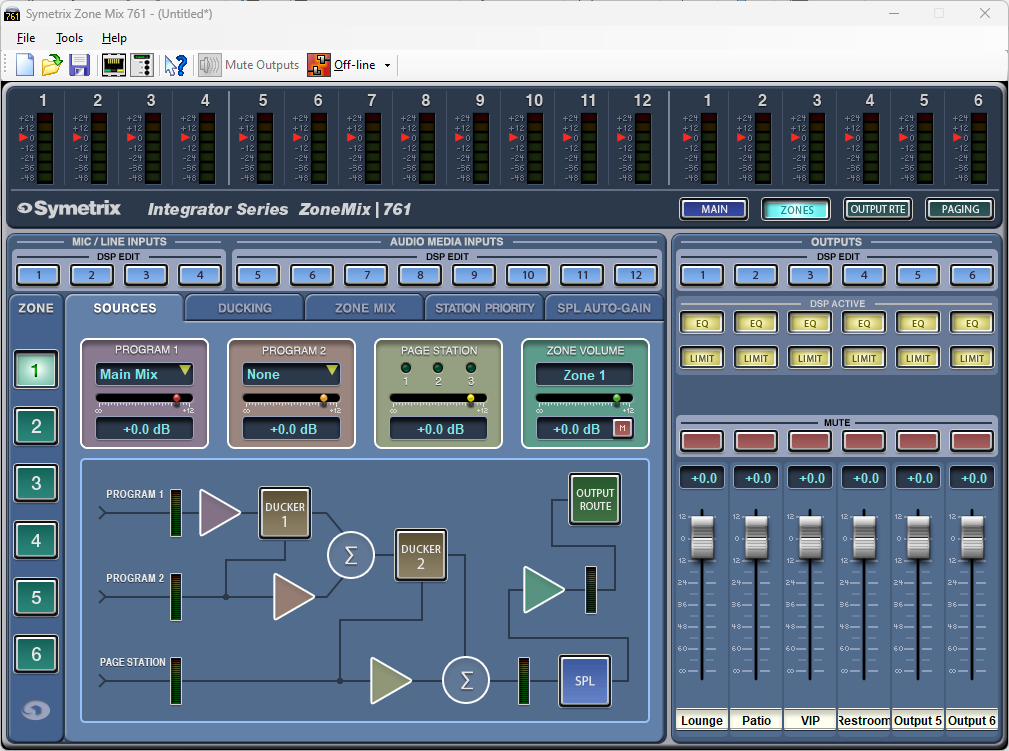
In the Zones area, under the Sources tab there are two source selections, Program 1 and Program 2. Program 2 ducks Program 1, and Page Station ducks both Program 1 and 2 as shown in the signal flow diagram.
Either Program 1 or Program 2 can be used for the zone source select depending on what the system needs. This example assumes there is no ducking/priority paging involved and will use Program 1 for the zone source. Program 2 can be set to None.
Effectively, the zone volume can be controlled by either the Program 1 slider or the Zone Volume slider. There may be a reason later to add a paging microphone or something similar, so it programmatically makes sense to use the Zone Volume slider.

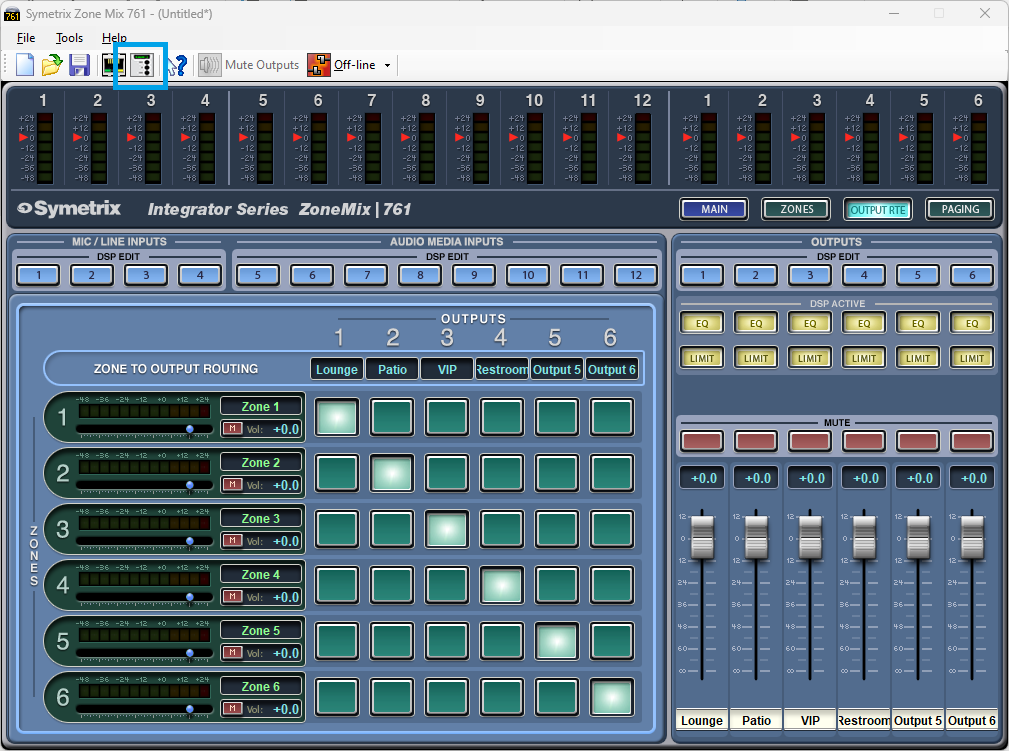
Looking in the Output RTE area, notice the stair step pattern to the cross-points. This is how we connect Zone 1 to Output 1, Zone 2 to Output 2, and so on. This way each Zone represents actual Output areas in the venue. In this configuration, we can consider Zone 1 that Lounge, Zone 2 the Patio, and so on.
The volume slider on each zone channel is the same control as the Zone Volume slider in the Zones Sources tab.
Open the External Controller Wizard.
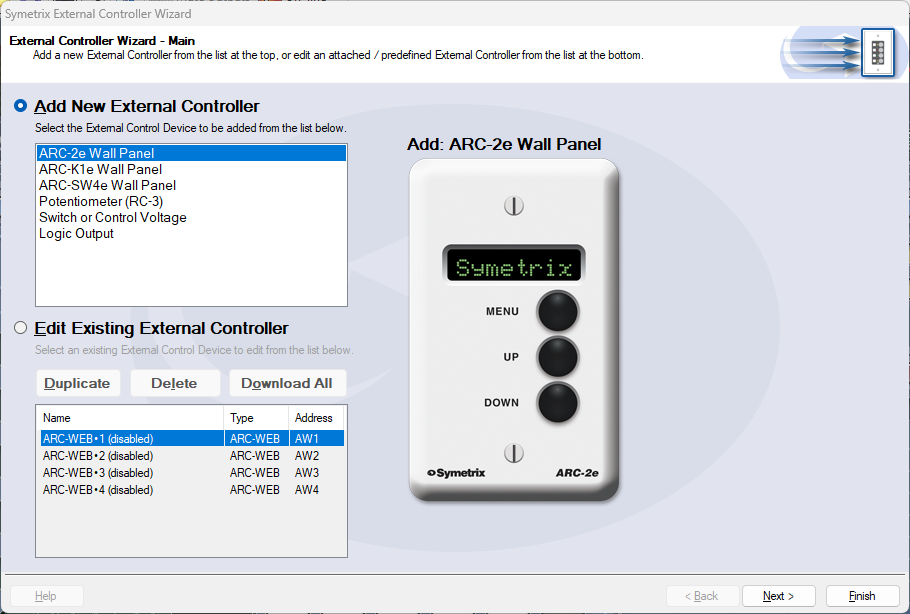
There are two lists here. This Tech Tip will be programming a new ARC-2e. With Add External Controller selected, highlight the ARC-2e and click Next.
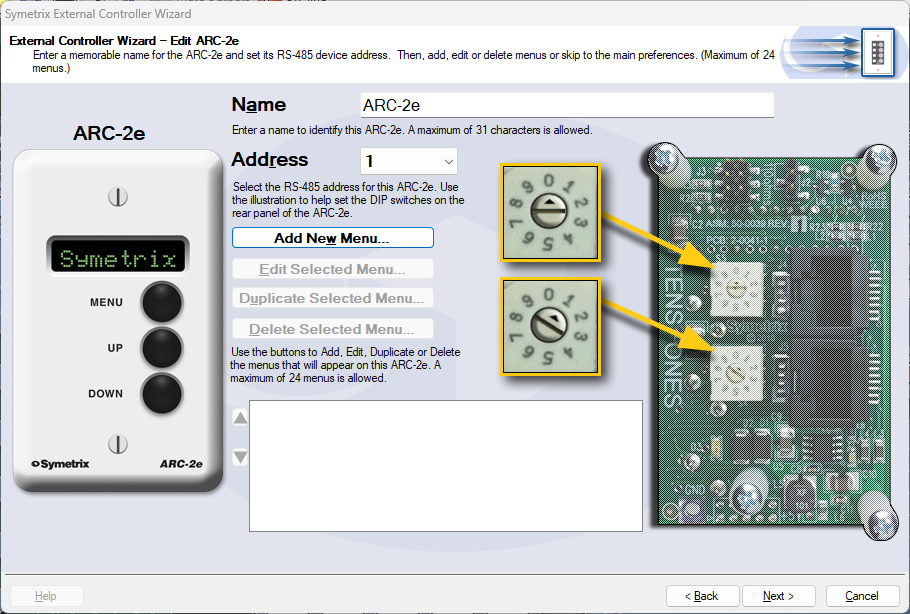
The name of the ARC-2e can be edited here, which we will call System Control in this example. Ensure that the ARC-2e is addressed correctly according to the dials on the back of the unit. When ready, click Add New Menu.
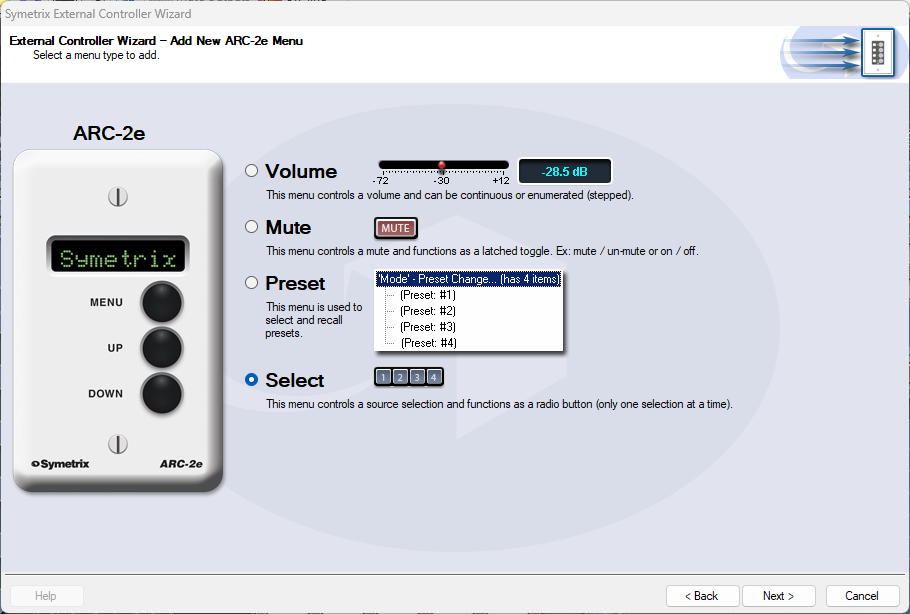
First, we’ll set up source select for Zone 1 (Lounge). Choose the “Select” option and click Next.
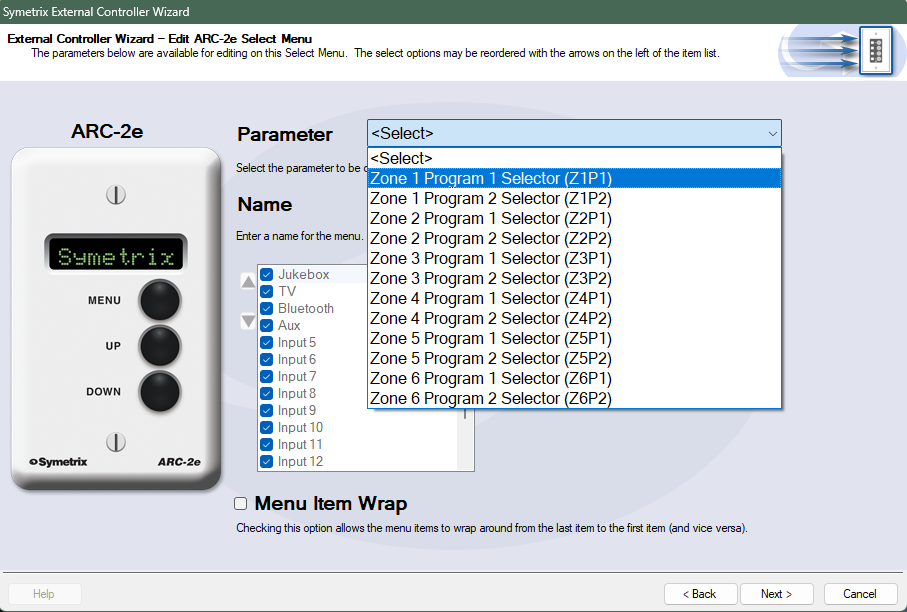
The Parameter selection is where we define the parameter for source selection in Zone 1. Choose Zone 1 Program 1 Selector. The Name can also be edited, which will be Lounge Source here.
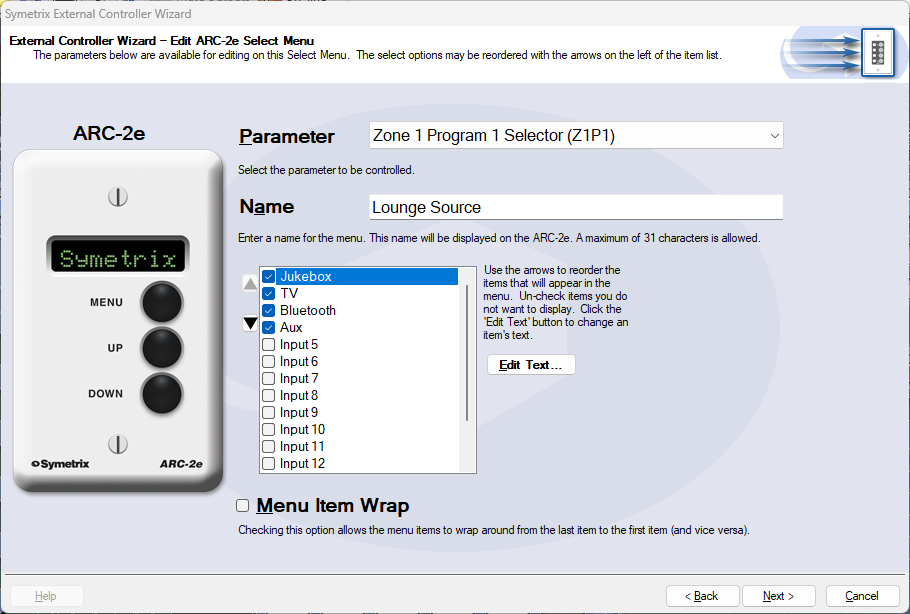
The checkbox list below Name is where we decide which analog input sources should be included as options for the Lounge Source. Uncheck any sources that should not be included and click Next. We are returned to the ARC-2e home menu where we can see the Lounge Source menu listed.
Next, we’ll set up a Zone Volume control. Click Add New Menu.
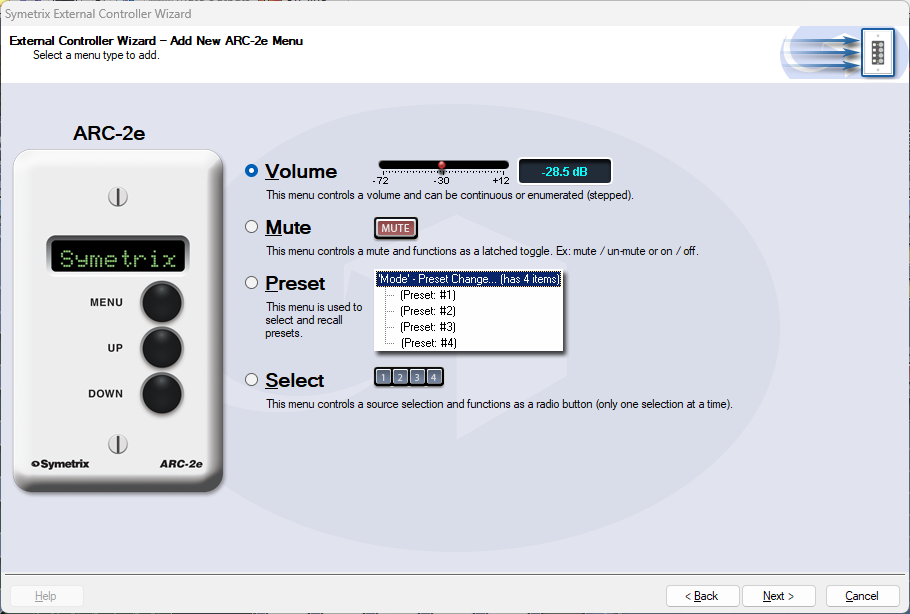
Select the Volume option and click Next.
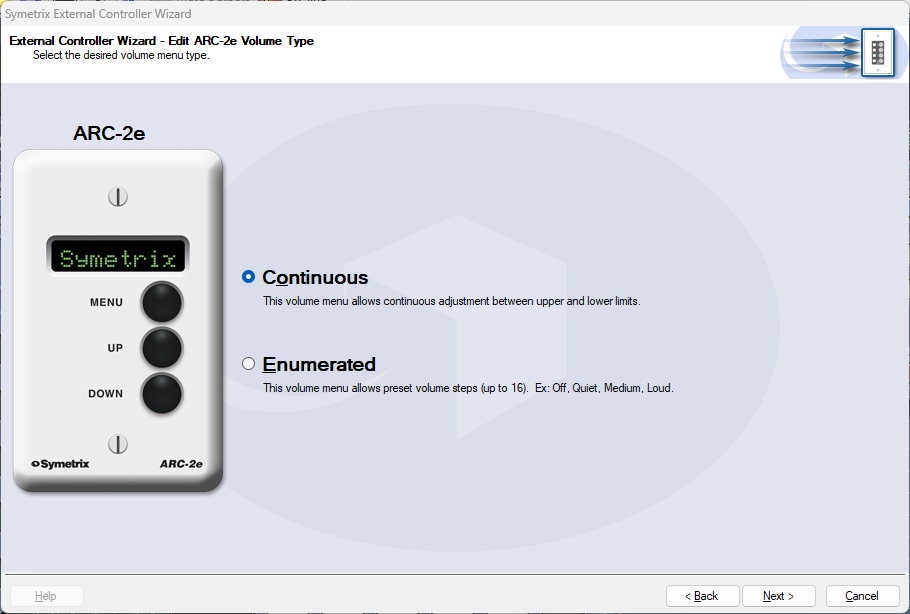
In most cases Continuous will be the better option for more precise control. However, Enumerated may be a more intuitive option for user control. In this example, we’ll select Continuous and click Next.
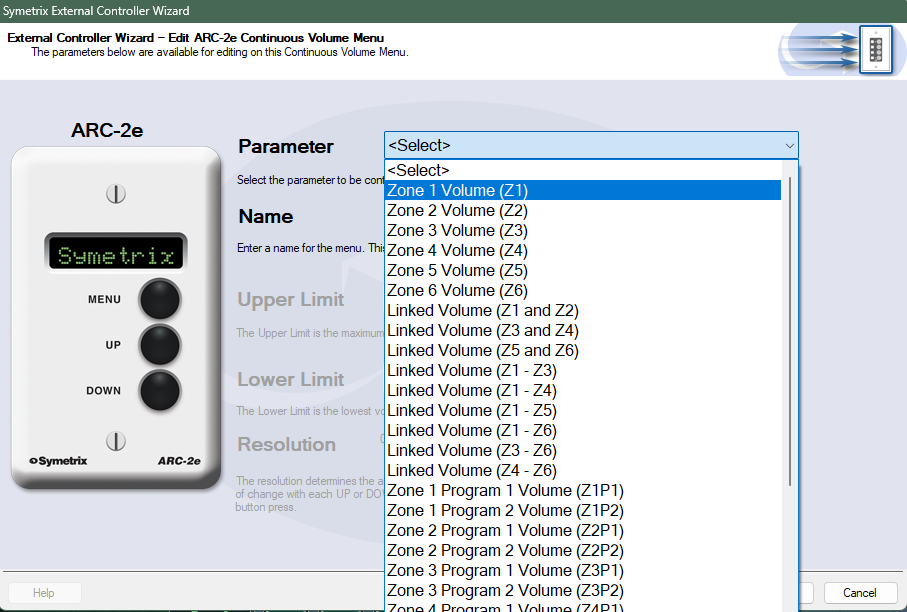
Select Zone 1 Volume to connect this control to the Zone Volume slider in Zone 1. The control Name and upper/lower limits can also be edited, which will be Lounge Volume and leave as default respectively in this example. Click Next.
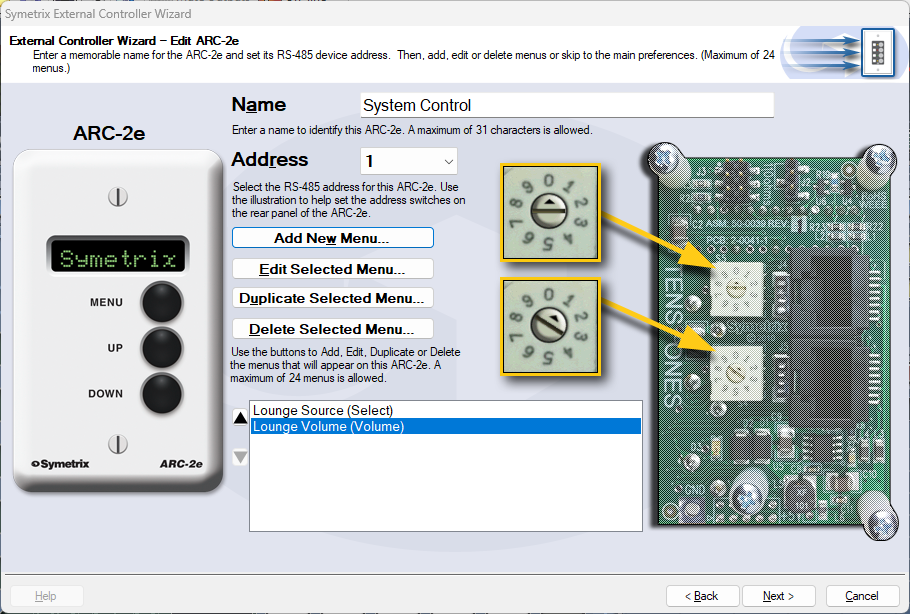
We are returned back to the ARC-2e home menu where we can see both Lounge Source and Lounge Volume listed.
Click Next for more options related to the ARC-2e unit itself, and Next again for a section that offers the ability to Simulate the ARC-2e, to test your work.
Note: Some parameters may act oddly in simulation mode. This is a known issue.
When finished programming all other relevant zone controls, click Finish to save.
The Symetrix ARC-WEB is a web app remote control for the Jupiter family of audio processors. Now you can use your iPad, iPhone or Android device to control volume, mutes, or presets in your Jupiter 4, 8, or 12. This tech tip will walk you through the steps of setting up and using the Symetrix ARC-WEB.
1) Make sure you have the latest version of the Jupiter software available at www.symetrix.co installed on your Windows compatible computer. (ARC-WEB is included in software versions 2.0 and later.)
2) After selecting and configuring the appropriate Jupiter app for your install, launch the External Controller Wizard found in the Tools menu.
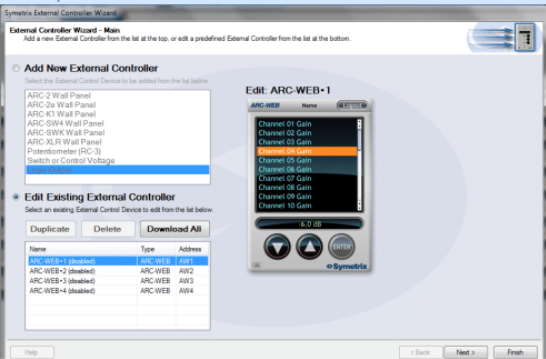
3) Choose Edit Existing External Controller and select one of the four available ARC-WEBs to program.
4) Proceed through the Wizard and follow the instructions to enable, name, and add menus for controls such as volume, mutes and presets. Note, if you are familiar with ARC-2 programming, it is almost identical to programming the ARC-WEB.
5) After you are finished adding up to 24 menus of controls, proceed through the Wizard to configure security if desired. Each ARC-WEB may have a unique username and password.
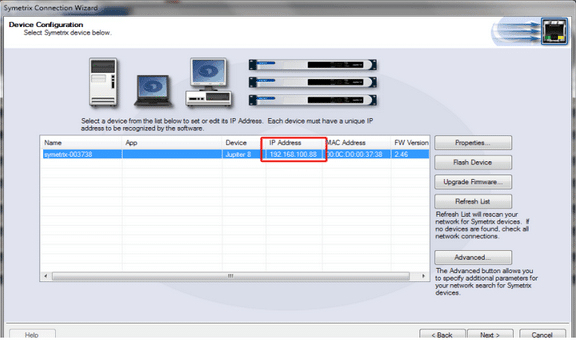
6) Finally, if the Jupiter software is currently online with the device, the final page of the Wizard will show a button to immediately launch the ARC-WEB in your computer’s Internet browser. (Note, you can repeat steps 2-5 up to four times as four ARC-WEBs are supported per DSP.). To launch ARC-WEB on your iPad, iPhone or Android device simply enter Jupiter’s IP address into the mobile device’s web browser. You can obtain Jupiter’s IP address from the Connection Wizard under the Tools menu, or from the Toolbar if currently online. Make sure Jupiter and your mobile device are both connected to a common Wi-Fi enabled network. Generally, the mobile device will connect to a wireless access point over Wi-Fi and Jupiter will connect to via Ethernet to that wireless access point, or a common switch or router. Internet (WAN) communication is also possible if public access to the Jupiter is enabled by your router or firewall. For information on this, search ‘port forwarding’ in our knowledge base at www. symetrix.co or contact your IT department.
7) Next, we will add an icon to your device’s home screen. This example uses an iPhone. Tap the action button in the bottom middle of the phone’s screen.
8) Then tap ‘Add To Home Screen’.
9) Now give your ARC-WEB a custom name if you wish, then tap the Add button.
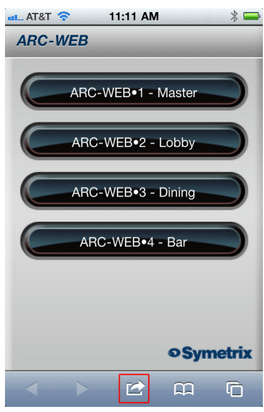
10) Locate and tap the ARC-WEB icon on your home screen and the ARC-WEB app will launch.
11) Then, select one of the four ARC-WEBs..
12) Now, start controlling! Simply select a menu from the drop-down and then use the UP and DOWN buttons to change volume, fire a preset, or turn a mute ‘on’ or ‘off’.

In order to be effective, end user control systems need to be simple and intuitive. Some might even call the previous sentence an understatement.
In the audio world decibel (also known as dB) is the standard measurement of sound level and makes perfect sense when viewed on a fader or volume control on a control system. For the end user, reading a volume control’s current position in dB might be much like reading a foreign language, not making much sense unless they have received formal training on what the dB scale means.
Rather than providing training manuals to explain a dB scaled volume control, it may often times prove much easier to simply provide the volume control to the end user as a percentage, or % value instead.
When using Symetrix hardware this is easily accomplished with some creative programming in Composer. Here are the steps for creating volume menus in an ARC-2e or ARC-WEB that read in percent.
Step 1.
checked
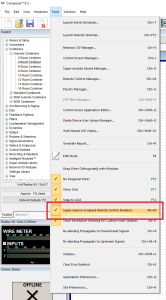
First, be sure “Super-impose Assigned Controller Numbers” is checked under the Tools dropdown in Composer.
Step 2.
Next, assign controller numbers to the volume faders of a Gain, Mixer, Matrix, or Room Combiner in Composer using either:
a. “Auto-assign Next Controller Number” (see Figure 1.1)
b. “Set up to Remote Control… > Generic Controller Numbers
Assignment” (see Figure 1.2) to the dB faders in which the end user
will be given access to control with the ARC-2e or ARC-WEB. Do
not add these assignments to the ARC-2e or ARC-WEB at this time.
figure 1.1
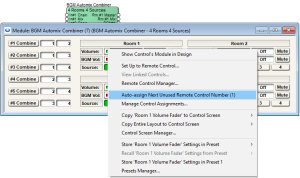
Figure 1.1: Auto-assigning a controller number to a BGM Room Combiner volume fader.
Figure 1.2
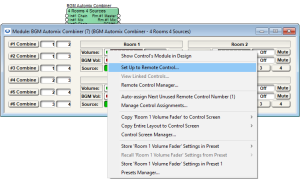
Figure 1.2: Set up to Remote Control… > Generic Controller Numbers Assignment
Step 3.
step 3
After assigning volume faders a controller number, the assignment should be visible on the module’s user interface.
numbers
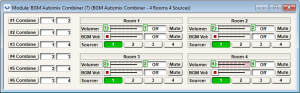
See the green rectangles with control numbers.
Step 4.
Next, from the Composer toolkit, from Control Modules>Control Inputs drag out a “1 Fader” module into the design.
step 4
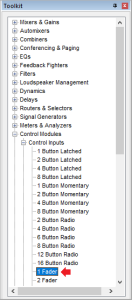
Next, from the Composer toolkit, from Control Modules>Control Inputs drag out a “1 Fader” module into the design.
Step 5.
Next, open the 1 Fader module and assign a controller number to the control fader. Notice the control fader reads in % instead of dB.
step 5
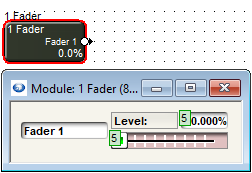
Next, open the 1 Fader module and assign a controller number to the control fader. Notice the control fader reads in % instead of dB.
Step 6.
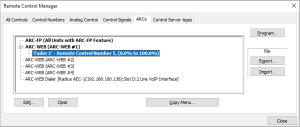
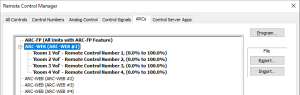
Now open the Remote Control Manager under the Tools dropdown (or Ctrl+M). Notice the volume fader assignments and the 1 fader assignment in the Control Numbers tab.
step 6
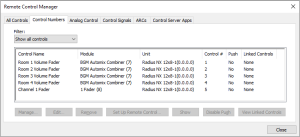
Now open the Remote Control Manager under the Tools dropdown (or Ctrl+M). Notice the volume fader assignments and the 1 fader assignment in the Control Numbers tab.
Step 7.
Click on the 1 Fader control assignment to select it and click Set Up Remote Control…
step 7
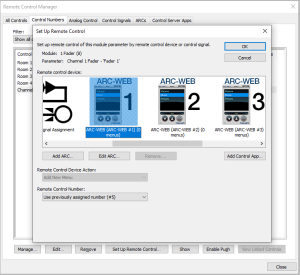
Click on the 1 Fader control assignment to select it and click Set Up Remote Control.
Step 8.
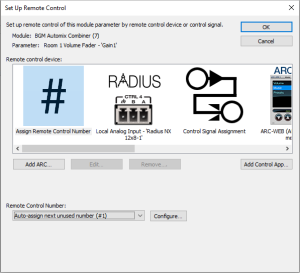
Scroll to select the Remote Control Device of choice, an ARC-WEB or ARC-2e, and then click OK. This will add a 0-100% menu item into the selected remote control device.
Step 9.
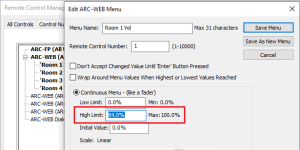
Move to the ARCs tab and expand the ARC-WEB or ARC-2e associated with these controls and then double click on the Fader 1 menu, or click to highlight and hit the Edit… button near the bottom of the window to access the Edit ARC Menu.
step 9
Move to the ARCs tab and expand the ARC-WEB or ARC-2e associated with these controls and then double click on the Fader 1 menu, or click to highlight and hit the Edit… button near the bottom of the window to access the Edit ARC Menu.
Step 10.
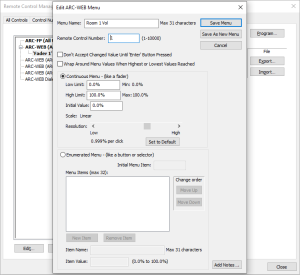
Change the Menu Name and Controller Number to the desired dB fader assignment from Step 3. In this example Controller #1 was for Room 1 Volume. Note, the controller number must match the assignment but the Menu Name can be labeled anything. This menu name is what the end user will see on the ARC display.
step 10
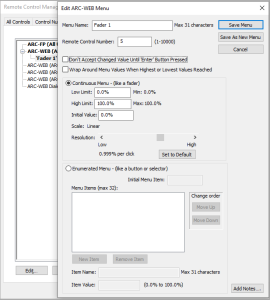
Change the Menu Name and Controller Number to the desired dB fader assignment from Step 3. In this example Controller #1 was for Room 1 Volume. Note, the controller number must match the assignment but the Menu Name can be labeled anything. This menu name is what the end user will see on the ARC display.
Step 11.
step 11
Hit the Save Menu button.
Manager
Step 12.
Repeat steps 4-12 for all subsequent volume fader assignments that will read in % value, each BGM Combiner fader having its own 1 Fader control input module.
Step 13.
When completed with the % value ARC programming. Push the site file to the SymNet system and program the RS-485 network.
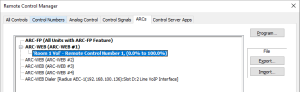
Step 14.
step 14
The end user will now see % values for volume controls rather than dB values.
Step 15.
Note: On a -72dB to +12dB volume fader, if it is desired to scale a volume control so that 0dB is the max level an end user can turn up the gain, set the High Limit to 84%.